|
|
Post by DUKE 77 on Jan 28, 2018 7:10:17 GMT -5
OK, sorry about the late reply. First of all it’s good to see you back, I hope you are doing better health wise. Ok, the pin part.... my advice is to sand the part, preferably with a rotary tool and a fine sand drum if posible, to get rid of all the glue and get a flat surface. I would then just glue the new part over the old part and save myself a headache. The pin is just 1mm thick, I don’t think it’s going to affect how it looks much. Try holding the pin in place with some tape and insert it on the figure to see if it works. If it does, then just snap the pin on the other plate and repeat the process. Again, I don’t think the extra millimiter is going to cause a significant change. But try with the tape first and if you like the result, glue for a permanent result. Go easy with the glue! You can always add more if the part detaches but it will be a nightmare to fix if you over glue. Let me know if this helps Thanks but problem is: my poor sight is no longer allowing me to do this! |
|
|
|
Post by DUKE 77 on Jan 28, 2018 7:19:26 GMT -5
Okay, here is an idea maybe one of you guys who did not buy their GX-75 from eBay could help me out! A Japanese friend of mine contacted Bandai Asia, Bandai told him I have to return it to the store I bought it from. The problem is the eBay seller who I got it from is a jerk who ain't doing a thing 'bout it! I tried to contact some toy stores in a hope to buy that sh*tty piece! BBTS told me they cannot serve me for items I didn't buy from their site (uh, tell me about no declaring lowered values and letting Egypt postal customs f**k us up). So, my hope here is if someone of you could claim that his right-side piece got a QC issues and fell down (like what excatly happened to my item), then the store offers him a replacement piece (even if I have to ship my broken part to you), then you ship me the new undamaged part, that would be absolutely appreciated! Will pay for all costs, of course!  Anyone?  |
|
|
|
Post by smokinchogokin on Jan 28, 2018 8:31:52 GMT -5
Bandai released a $200 robot that breaks and hasn’t done anything about it?!
|
|
|
|
Post by DUKE 77 on Jan 28, 2018 9:10:27 GMT -5
Bandai released a $200 robot that breaks and hasn’t done anything about it?!  Yes, and they should have called it f**kinkaiser! |
|
|
|
Post by smokinchogokin on Jan 28, 2018 13:21:55 GMT -5
That’s gsrbsge. Bottom line.
|
|
|
|
Post by DUKE 77 on Jan 28, 2018 21:51:19 GMT -5
OK, sorry about the late reply. First of all it’s good to see you back, I hope you are doing better health wise. Ok, the pin part.... my advice is to sand the part, preferably with a rotary tool and a fine sand drum if posible, to get rid of all the glue and get a flat surface. I would then just glue the new part over the old part and save myself a headache. The pin is just 1mm thick, I don’t think it’s going to affect how it looks much. Try holding the pin in place with some tape and insert it on the figure to see if it works. If it does, then just snap the pin on the other plate and repeat the process. Again, I don’t think the extra millimiter is going to cause a significant change. But try with the tape first and if you like the result, glue for a permanent result. Go easy with the glue! You can always add more if the part detaches but it will be a nightmare to fix if you over glue. Let me know if this helps 💡 Brother!!! Could you please create a 3D Printing file with the Fire Blasters (chest plates) themselves so we could print them in red hard acrylic on Shapeways and insert the metal pins you've already created into them?!!! |
|
|
|
Post by xchr23dc on Jan 29, 2018 11:32:37 GMT -5
This is an amazing idea and forever will be appreciated !! Second the idea
|
|
|
|
Post by ninjahandz on Feb 5, 2018 16:58:53 GMT -5
OK, sorry about the late reply. First of all it’s good to see you back, I hope you are doing better health wise. Ok, the pin part.... my advice is to sand the part, preferably with a rotary tool and a fine sand drum if posible, to get rid of all the glue and get a flat surface. I would then just glue the new part over the old part and save myself a headache. The pin is just 1mm thick, I don’t think it’s going to affect how it looks much. Try holding the pin in place with some tape and insert it on the figure to see if it works. If it does, then just snap the pin on the other plate and repeat the process. Again, I don’t think the extra millimiter is going to cause a significant change. But try with the tape first and if you like the result, glue for a permanent result. Go easy with the glue! You can always add more if the part detaches but it will be a nightmare to fix if you over glue. Let me know if this helps 💡 Brother!!! Could you please create a 3D Printing file with the Fire Blasters (chest plates) themselves so we could print them in red hard acrylic on Shapeways and insert the metal pins you've already created into them?!!!That was in fact my original plan. The problem is the parts are not going to be super smooth like the real deal. The other problem is going to be to match the paint. That’s why I did only the pins. I can give it a try and try to make the plates but I don’t think you are going to be satisfied with the results. I’ll let you know as soon as I have some time to sit down and draw the new plates. Probably during the weekend depending on my work load |
|
|
|
Post by DUKE 77 on Feb 6, 2018 8:06:05 GMT -5
💡 Brother!!! Could you please create a 3D Printing file with the Fire Blasters (chest plates) themselves so we could print them in red hard acrylic on Shapeways and insert the metal pins you've already created into them?!!!That was in fact my original plan. The problem is the parts are not going to be super smooth like the real deal. The other problem is going to be to match the paint. That’s why I did only the pins. I can give it a try and try to make the plates but I don’t think you are going to be satisfied with the results. I’ll let you know as soon as I have some time to sit down and draw the new plates. Probably during the weekend depending on my work load Now, we have HOPE! Thank you very very much, bro. We won't lose anything giving it a try! It's a nightmare knowing that we own a SOC Mazinkaiser, while we aren't able to display him because of that lil' damn plastic piece. I am not sure why wouldn't it be smooth? Acrylic plastic should be smooth. If 3D printing can't give us such a result, then, I might try laser cut on a smooth piece of acrylic plastic; following your design. As for the paint, metallic red paint spray would do the job! I think your biggest challenge would be to design the fire blasters in a way that will not hinder the middle Z piece from going all-through! Good luck and really tons of thanks for helping us, bro. |
|
|
|
Post by ninjahandz on Feb 12, 2018 12:38:22 GMT -5
|
|
|
|
Post by DUKE 77 on Feb 14, 2018 0:23:59 GMT -5
This is an amazing idea and forever will be appreciated !! Second the idea If it doesn't fit, I can ship you my fireblaster, later -- whatever you are creating, it will be surly better than Bandai's crap with their GX-75! Thank you very much! I really appreciate it. MAZINPOWER! |
|
|
|
Post by ninjahandz on Feb 23, 2018 18:43:03 GMT -5
|
|
|
|
Post by locidm on Feb 23, 2018 18:56:06 GMT -5
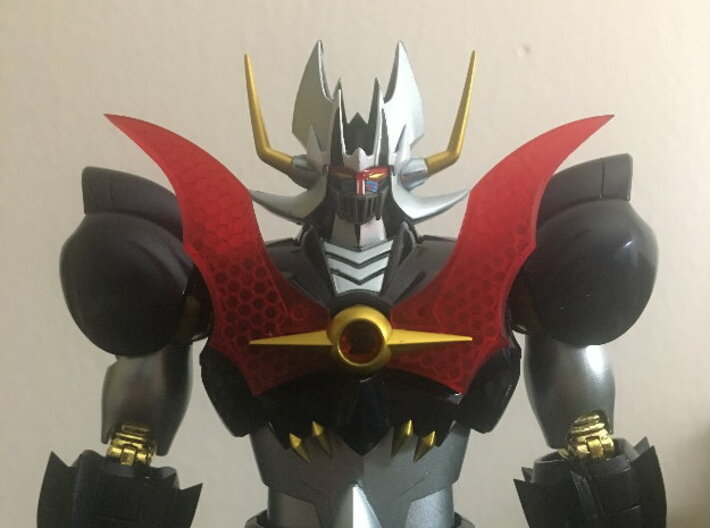
Looks great! Fantastic job!
Does the plates itself require sanding before painting? Or just the knob?
Did you use spray paint in a can or did you use an airbrush?
This could revive a lot of GX-75!
|
|
|
|
Post by tturbozx66 on Feb 23, 2018 19:00:15 GMT -5
Damn! That looks good. Great work! |
|
|
|
Post by greengetterguy on Feb 23, 2018 21:01:28 GMT -5
I told you Ninja was a great resident artisan.
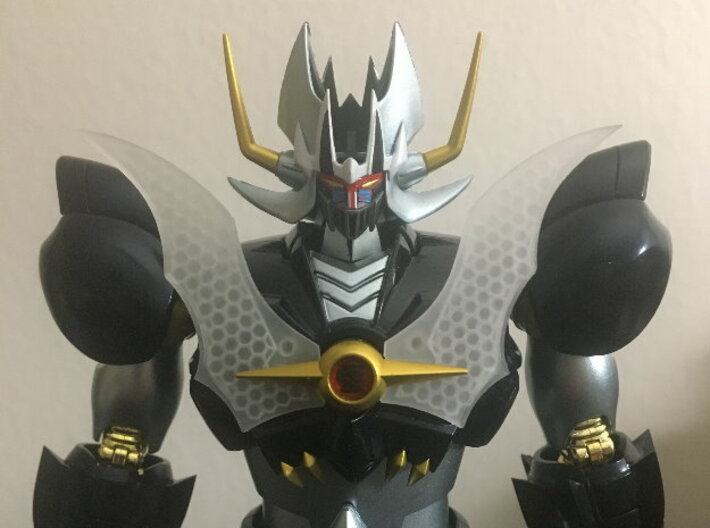
The unpainted one looks great as it is. It goes really nicely with Kaiser's silver head.
|
|
|
|
Post by ninjahandz on Feb 23, 2018 21:19:38 GMT -5
Looks great! Fantastic job! Does the plates itself require sanding before painting? Or just the knob? Did you use spray paint in a can or did you use an airbrush? This could revive a lot of GX-75! Thanks man! I sanded it all with one of those sanding blocks you find at those beauty supplies stores like Sally’s. Very easy to get. They are meant for nails but work great on clear acrylic. I just sanded a bit to remove the stepping effect from the printer. I then added about 8 to 10 light coats of Tamiya’s clear red (TS-74). It comes in a can so there’s no need for compressors or fancy airbrushes! Took about 20 minutes from start to finish |
|
|
|
Post by ninjahandz on Feb 23, 2018 21:23:54 GMT -5
I told you Ninja was a great resident artisan. The unpainted one looks great as it is. It goes really nicely with Kaiser's silver head. Thanks man, at leat trying with my limited skills! About the white plates, I though the same thing too! For some reason the white plates look nice with the rest of the figure. I though I was crazy but hey... it some how works! |
|
|
|
Post by greengetterguy on Feb 23, 2018 21:31:04 GMT -5
Gold Satin would also look awsome!!
Instant Limited Gold "noir" GX-75!!!
Its so easy to arm chair critique teehee.. Its awsome Ninja, great work.
|
|
|
|
Post by greengetterguy on Feb 23, 2018 21:34:39 GMT -5
Have you thought about selling these to BBTS as a business? A third party SOC accessory developer!
|
|
|
|
Post by ninjahandz on Feb 23, 2018 23:26:36 GMT -5
Have you thought about selling these to BBTS as a business? A third party SOC accessory developer! I have something very similar to that in mind but requires me to buy my own 3d printer to make it cost effective. I am working on several things now. Once I have enough merchandise, I will get the printer |
|