|
|
Post by mpchi on Aug 8, 2023 22:00:04 GMT -5
SOC GX-104 GaoFighGar came with a not very secure knee connection when combined. You can literally flick the drill/red block outwards with a single finger without using much force, and the lock will be undone and the whole lower leg will dislodge and fall off, due to its weight and gravity. If you want to strengthen the knee connection and make it more secure, I have a solution for you. COMMERCE OPERATION LOOSEY GOOSEY!!! APPROVED!!!
Here is the basic structure of the knee connection. 2 spring loaded rectangular nubs, 2 spring loaded circular nubs, and a main lock in the center knee (behind the drill on the backside of the red block). The issue is that, while there are multiple contact points on this knee connection, all the spring loaded nubs are quite weak and not doing their job holding onto Gaofar's knee. It mostly rely on the center lock, which also relies on those 2 circular nubs to keep it in locked position. 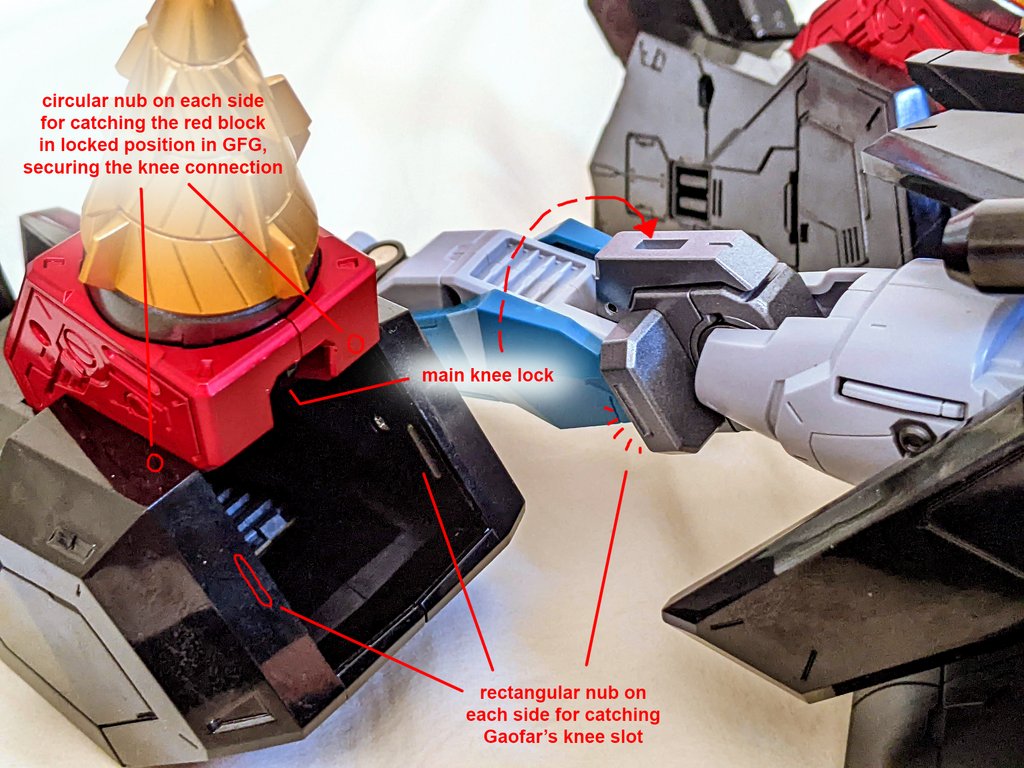 So what we are going to do, is to take apart the Drill Gao II (lower legs), and strengthen the springs in those nubs, so they are stronger and can hold onto the legs tighter. Here is what it looks like when taken apart, after removing the 3 screws that holds the 2 halves together. 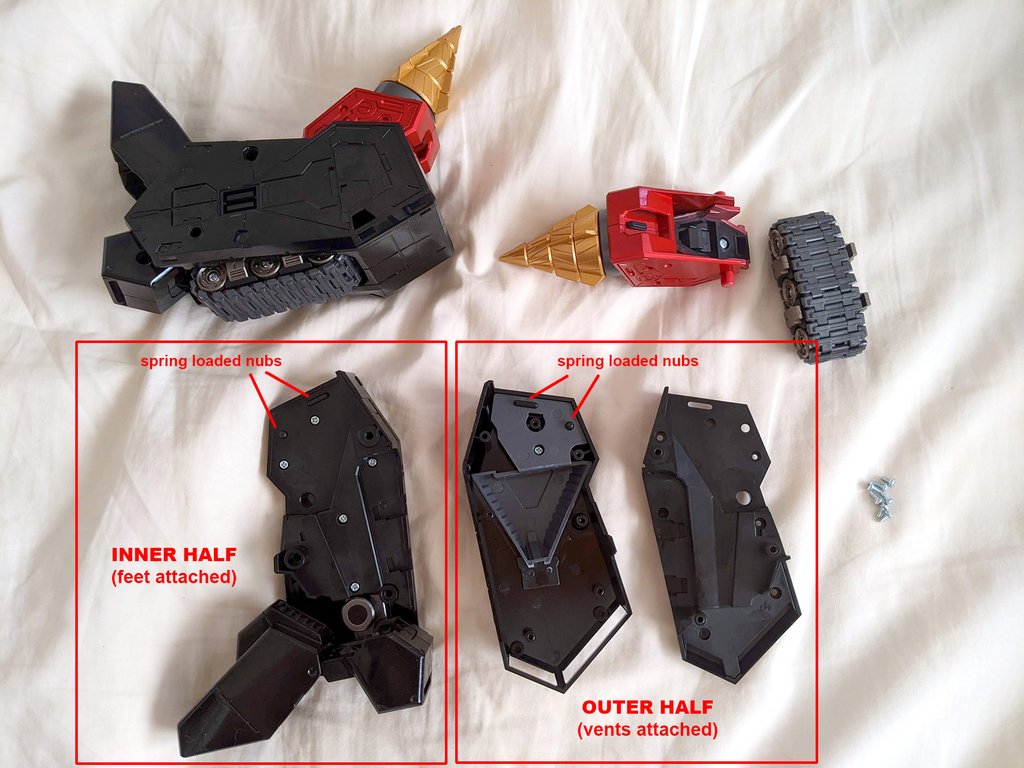 We first work on the OUTER HALF, where the leg vents are connected (extra gray piece). It is pretty easy to take apart. Just make sure you don't lose the screws and the springs, as they are very small. They are also all the same size, not difficult to keep track on. The problem with this half, is that there are cavities/hollow space where the springs sit. Bandai should have either use stronger springs, or make these cavities a lot more shallow, so there is more tension given to the spring for a stronger spring loaded nub.  So to remedy that, I stuff up those cavities with small pieces of paper towel, since they can fit very snug inside when you push them in with a skinny screwdriver, filling up the space nicely without making any mess or causing damage. Fill them enough so you still see the circular rod inside poking out a little (that is where the spring sits on). But filling too much/too high will make the spring loaded nub stop working properly. Best to test it with your finger pushing the nubs and see if they still spring back nicely after pretending you are closing it up, without putting on the screws. Once everything is working, close it back up and put the screws back. BE CAREFUL NOT TO STRIP THE THREADS when putting the screws back on. Be very gentle and line up the screw properly before you twist it in. They should go in very smooth with little to no resistance. If you need force, back out and redo it or try a different screw. 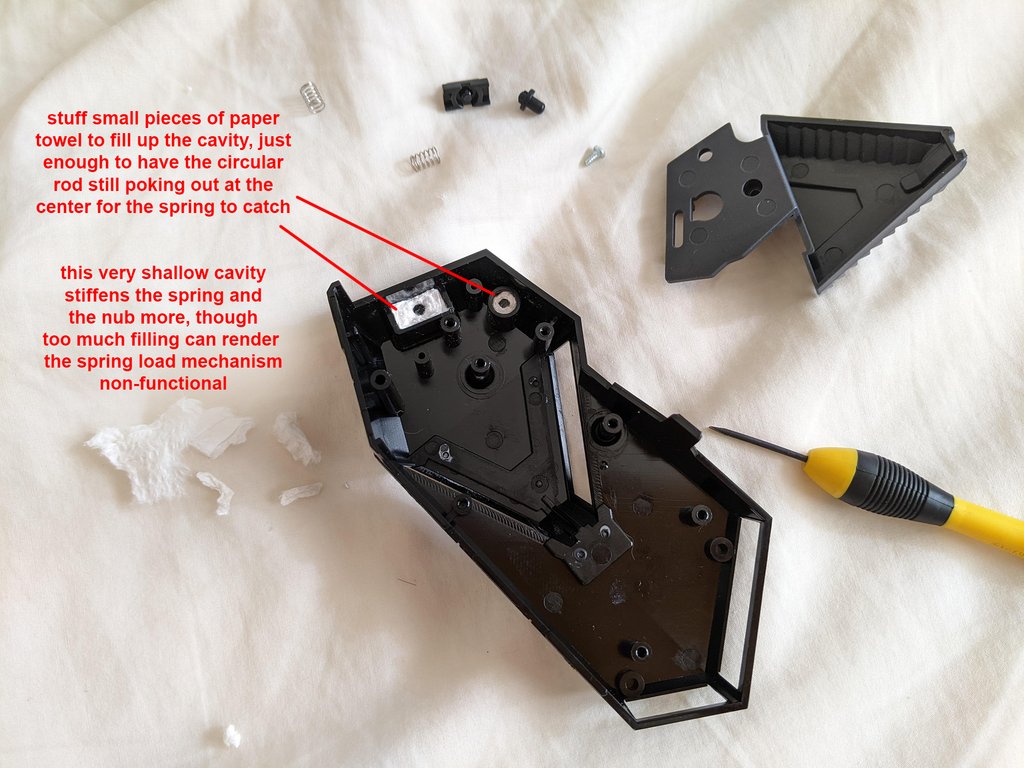 Now, get ready for Round 2, the INNER HALF, where the foot is attached to. 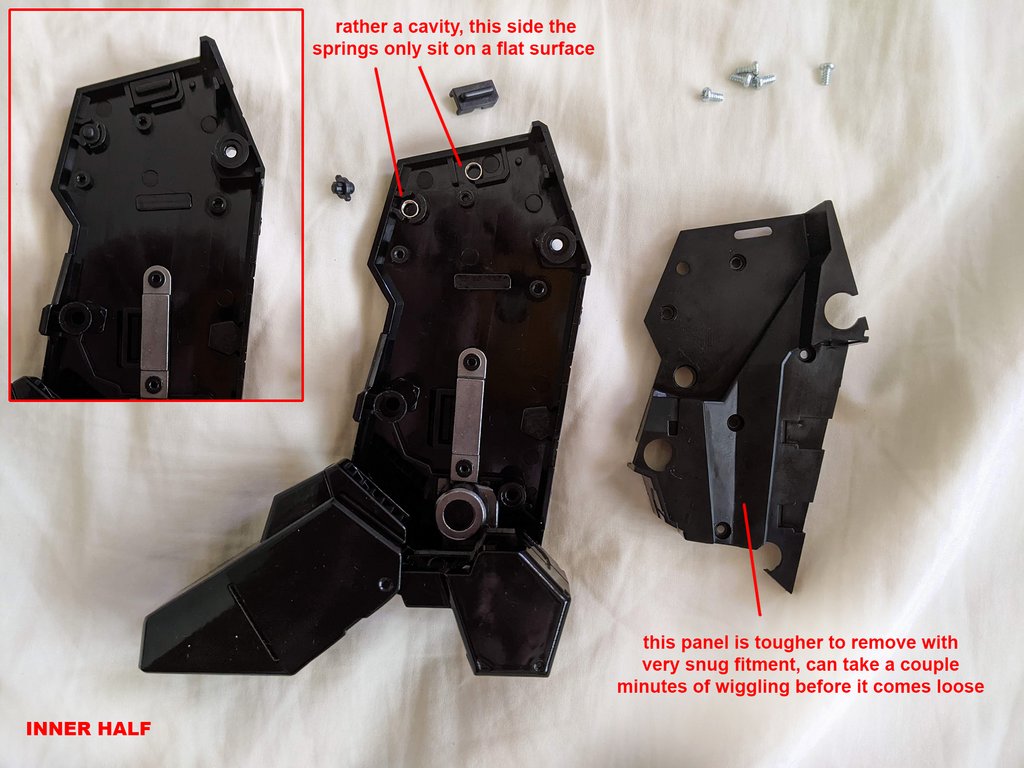 This side, the big panel that covers the inside of the leg is harder to get off. The fitment is very snug. There is no glue or anything, so it will eventually come off as you keep wiggling the plastic and flexing it a bit. Having some finger nails help to grab on some of those tight seams and screw slots. Took me a couple minutes of non-stop wiggling, but eventually opened up. Because the structure is thinner on this half where the springs sit, there is no cavity. Springs just sit on flat plastic surface, no more circular rod hold them in place here. 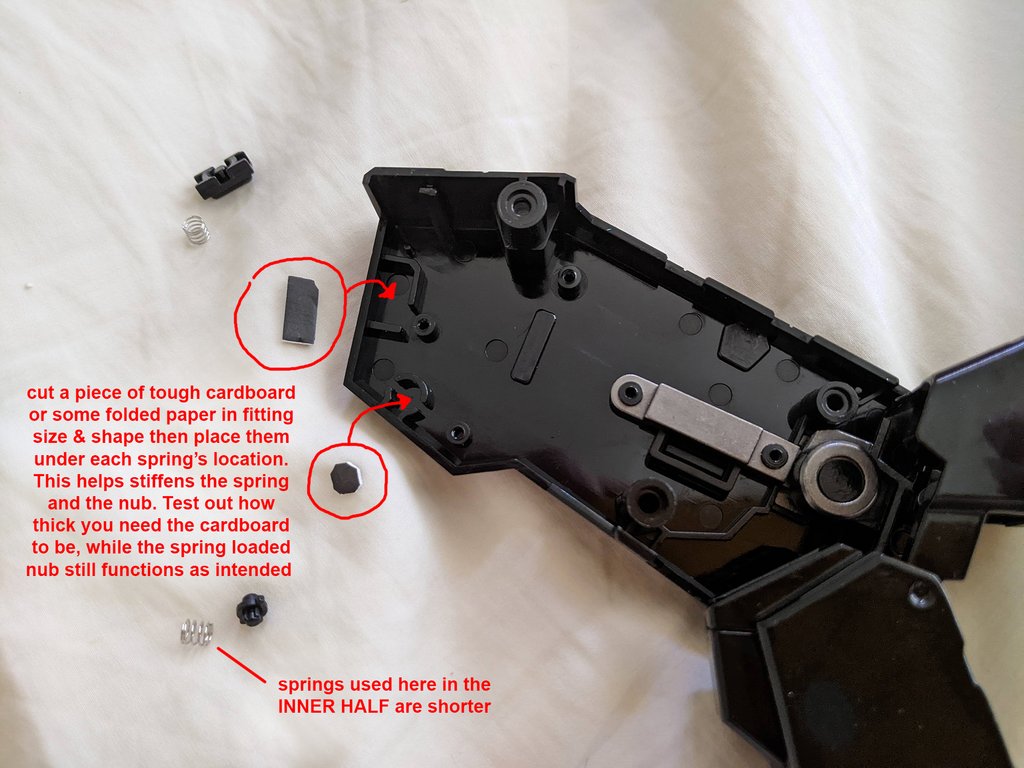 On this side, I cut out some fitting pieces of cardboard to do the job instead of paper towel. You can use some fold up paper too, whatever you find that can work and fit the space. The circular nub here is the tricky one, as you need to align it perfectly within that space or the big cover panel won't close back up. A flash light and that skinny screwdriver will come in handy when you get really close to closing it, but need to peek in and adjust that circular nub alignment a little. Once done and everything good to go, put the thing back together and careful screw back the screws on. 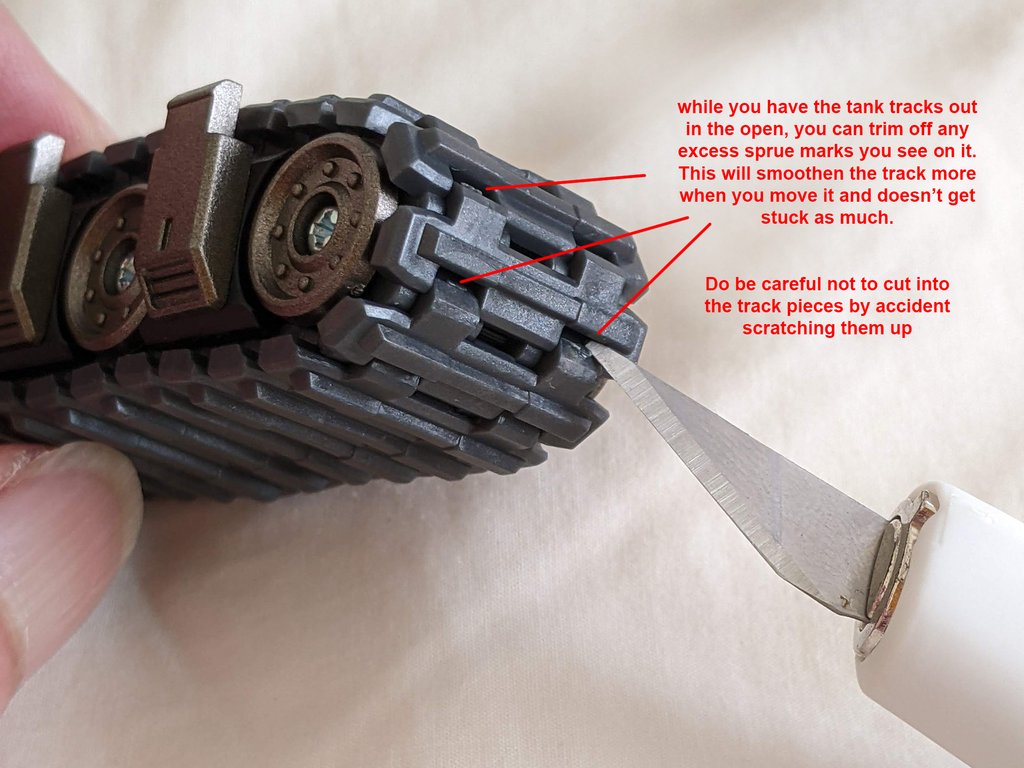 While you have the leg opened up, you can easily access the tank tracks, and trim off any excess sprue marks in the track segments. This will help make it roll smoother and not getting stuck as much. While not perfect, mine got quite a bit better than when it was out of the box (got stuck all the time). And make sure you check the direction of the tracks matches on both legs, when you put the whole leg back together. That's it! (after doing this to both legs, that is...) After this surgery, my GFG knees no longer dislodge with a flick of my finger. In fact, I have to give the drill/red block a good firm pull to get it come loose. And even without the main lock engaged, the 2 rectangular nubs are enough to hold onto Gaofar's knee without the lower leg falling off (though once I shake the figure, they will fall regardless). No question that Bandai had messed up this knee design (could have used better springs, lessen those cavity inside for better spring tension, bigger stronger nubs...etc.), I am just glad that this simple enough surgery managed to fix one of the main flaws I find on this figure. The weak knee connection now gone, and slightly improved tank tracks as well. The hip design is still messed up though, not sure I can fix that one... MISSION COMPLETE! YOSHAAAAAHHH~!!! |
|
|
|
Post by gunvalion on Aug 9, 2023 11:01:06 GMT -5
SOC GX-104 GaoFighGar came with a not very secure knee connection when combined. You can literally flick the drill/red block outwards with a single finger without using much force, and the lock will be undone and the whole lower leg will dislodge and fall off, due to its weight and gravity. If you want to strengthen the knee connection and make it more secure, I have a solution for you. COMMERCE OPERATION LOOSEY GOOSEY!!! APPROVED!!!
Here is the basic structure of the knee connection. 2 spring loaded rectangular nubs, 2 spring loaded circular nubs, and a main lock in the center knee (behind the drill on the backside of the red block). The issue is that, while there are multiple contact points on this knee connection, all the spring loaded nubs are quite weak and not doing their job holding onto Gaofar's knee. It mostly rely on the center lock, which also relies on those 2 circular nubs to keep it in locked position. So what we are going to do, is to take apart the Drill Gao II (lower legs), and strengthen the springs in those nubs, so they are stronger and can hold onto the legs tighter. Here is what it looks like when taken apart, after removing the 3 screws that holds the 2 halves together. We first work on the OUTER HALF, where the leg vents are connected (extra gray piece). It is pretty easy to take apart. Just make sure you don't lose the screws and the springs, as they are very small. They are also all the same size, not difficult to keep track on. The problem with this half, is that there are cavities/hollow space where the springs sit. Bandai should have either use stronger springs, or make these cavities a lot more shallow, so there is more tension given to the spring for a stronger spring loaded nub. So to remedy that, I stuff up those cavities with small pieces of paper towel, since they can fit very snug inside when you push them in with a skinny screwdriver, filling up the space nicely without making any mess or causing damage. Fill them enough so you still see the circular rod inside poking out a little (that is where the spring sits on). But filling too much/too high will make the spring loaded nub stop working properly. Best to test it with your finger pushing the nubs and see if they still spring back nicely after pretending you are closing it up, without putting on the screws. Once everything is working, close it back up and put the screws back. BE CAREFUL NOT TO STRIP THE THREADS when putting the screws back on. Be very gentle and line up the screw properly before you twist it in. They should go in very smooth with little to no resistance. If you need force, back out and redo it or try a different screw. Now, get ready for Round 2, the INNER HALF, where the foot is attached to. This side, the big panel that covers the inside of the leg is harder to get off. The fitment is very snug. There is no glue or anything, so it will eventually come off as you keep wiggling the plastic and flexing it a bit. Having some finger nails help to grab on some of those tight seams and screw slots. Took me a couple minutes of non-stop wiggling, but eventually opened up. Because the structure is thinner on this half where the springs sit, there is no cavity. Springs just sit on flat plastic surface, no more circular rod hold them in place here. On this side, I cut out some fitting pieces of cardboard to do the job instead of paper towel. You can use some fold up paper too, whatever you find that can work and fit the space. The circular nub here is the tricky one, as you need to align it perfectly within that space or the big cover panel won't close back up. A flash light and that skinny screwdriver will come in handy when you get really close to closing it, but need to peek in and adjust that circular nub alignment a little. Once done and everything good to go, put the thing back together and careful screw back the screws on. While you have the leg opened up, you can easily access the tank tracks, and trim off any excess sprue marks in the track segments. This will help make it roll smoother and not getting stuck as much. While not perfect, mine got quite a bit better than when it was out of the box (got stuck all the time). And make sure you check the direction of the tracks matches on both legs, when you put the whole leg back together. That's it! (after doing this to both legs, that is...) After this surgery, my GFG knees no longer dislodge with a flick of my finger. In fact, I have to give the drill/red block a good firm pull to get it come loose. And even without the main lock engaged, the 2 rectangular nubs are enough to hold onto Gaofar's knee without the lower leg falling off (though once I shake the figure, they will fall regardless). No question that Bandai had messed up this knee design (could have used better springs, lessen those cavity inside for better spring tension, bigger stronger nubs...etc.), I am just glad that this simple enough surgery managed to fix one of the main flaws I find on this figure. The weak knee connection now gone, and slightly improved tank tracks as well. The hip design is still messed up though, not sure I can fix that one... MISSION COMPLETE! YOSHAAAAAHHH~!!!Just got my copy today After read ur tips its make me nervous how hard must re-attch and must adjust the articulation Thanks for your kind instruction ...👍🏻 But for the moment im not in the mood to open mine , will take some times to open box then Hope everything was fine in my copy |
|
|
|
Post by S_Gokin on Aug 9, 2023 12:56:54 GMT -5
mpchi thank you for the detailed fix the issue in here is like you go to a fine restaurant they gave you food but you end up cooking it again and add stuff, its a shame really this supposed to be a premium figure not a model kit
|
|
|
|
Post by zetaking on Aug 9, 2023 13:02:43 GMT -5
Am I just being jaded now over the fact that so many of current bandai releases are somewhat lagging in the quality dept?
|
|
|
|
Post by mpchi on Aug 9, 2023 13:05:15 GMT -5
Am I just being jaded now over the fact that so many of current bandai releases are somewhat lagging in the quality dept? Unfortunately, its their current trend. Funny thing is, they messed up 2 hips in a row.  (MB Shin Getter, and now SOC GFG) |
|
|
|
Post by xephon0930 on Aug 9, 2023 16:22:32 GMT -5
Geez. Mine mainly has issues with the arm spring in one of the arms as well as Phantom Gao not being solid added with the connection of Gaofighgar's knees is a bit loose without the 3rd connection.
Yeah. I feel in some ways this guy is a downgrade on the solid SoC Gaogaigar.
I am afraid for the SoC Exkaiser.
|
|
|
|
Post by mpchi on Aug 9, 2023 16:47:30 GMT -5
Geez. Mine mainly has issues with the arm spring in one of the arms as well as Phantom Gao not being solid added with the connection of Gaofighgar's knees is a bit loose without the 3rd connection. Yeah. I feel in some ways this guy is a downgrade on the solid SoC Gaogaigar. I am afraid for the SoC Exkaiser. Does your GX-68 GGG hold up well? Mine unfortunately didn't. I don't play with it much and just have it displayed in the cabinet. But when I took it out and compare with GFG, it is not as solid as I remembered (I used to think GGG was one of best releases in SOC, and mine is the original release, not reissues). The feel of the joints, the clickies, how stable it stands, they are not as good as GFG. It does have the advantage of not having some of those design flaws in GFG, and Galeon is nicer than Phantom Gao. But GFG feels more sturdy overall. Mine also started to yellow, slightly, and hard to tell in the photos I took, but you can tell in person. I am curious if your GGG overall holds up better. |
|
|
|
Post by xephon0930 on Aug 9, 2023 18:08:41 GMT -5
Geez. Mine mainly has issues with the arm spring in one of the arms as well as Phantom Gao not being solid added with the connection of Gaofighgar's knees is a bit loose without the 3rd connection. Yeah. I feel in some ways this guy is a downgrade on the solid SoC Gaogaigar. I am afraid for the SoC Exkaiser. Does your GX-68 GGG hold up well? Mine unfortunately didn't. I don't play with it much and just have it displayed in the cabinet. But when I took it out and compare with GFG, it is not as solid as I remembered (I used to think GGG was one of best releases in SOC, and mine is the original release, not reissues). The feel of the joints, the clickies, how stable it stands, they are not as good as GFG. It does have the advantage of not having some of those design flaws in GFG, and Galeon is nicer than Phantom Gao. But GFG feels more sturdy overall. Mine also started to yellow, slightly, and hard to tell in the photos I took, but you can tell in person. I am curious if your GGG overall holds up better. It does have some wear due to the weight but that is cause of age and I have been having gravity do the work by putting him in the Star Gaogaigar stand. The shoulder ratchets are a bit finicky. I am guessing that is why they limited the movement range for Gaofighgar. My biggest issue is the slight bit of yellowing which is not helped by an asshole room mate who smoked in the place I used to be living in. He crossed me one too many times and I beat the crap out of him. I don't smoke especially with damage being done to my collection as is from the sun. |
|
|
|
Post by mpchi on Aug 9, 2023 23:16:40 GMT -5
It does have some wear due to the weight but that is cause of age and I have been having gravity do the work by putting him in the Star Gaogaigar stand. The shoulder ratchets are a bit finicky. I am guessing that is why they limited the movement range for Gaofighgar. My biggest issue is the slight bit of yellowing which is not helped by an asshole room mate who smoked in the place I used to be living in. He crossed me one too many times and I beat the crap out of him. I don't smoke especially with damage being done to my collection as is from the sun. Yeah, guess yellowing is the bane of all Bandai light color stuff (SOCs, DX Valks, HMRs, some Metal Builds...etc.) as long as they are not fully painted. |
|
|
|
Post by mpchi on Aug 10, 2023 12:18:30 GMT -5
...Anyways,I managed to get the arm extension of SoC Goldymarg to work on my Gaofighgar. Had to file down the plastic very carefully and it eventually managed to fit. I don't know why it wasn't made to fit to begin with. I also noticed the same on mine. The extension piece fit pretty snug on GGG, but doesn't slide into GFG's arm. My observation tells me that most likely are the 4 'chiselled' corners of the square hole blocking the entry. Curious if those are the spots you filed down the plastic. What's weird is that, the couple reviews that displayed GFG with the Hammer on that used the extension piece (including wotafa's), they didn't mention about the fitment issue. But I don't want to force it in, since the receiving end is now diecast on GFG (plastic on GGG). Sure the paint will chip off, if I use brute force. Would like to hear your input, before I start working on mine. |
|
|
|
Post by S_Gokin on Aug 10, 2023 13:01:36 GMT -5
since you guys mention yellowing, i think the SOC GX-04 GX-04S is famous for that issue
all of the Spazers will get yellowish, for the marine and the drill the white paint (parts) even the chrome on both Grendizer and the drill spazer will get yellowish
it was very odd thing to see, luckily i managed to fix Grendizer, and i did the same on the spazers just in case, and it worked since that day they didnt become yellowish
oddly enough both Mazinger and Great were fine, it was only Grendizer !
i think Bandai hated Grendizer from the early days lol
|
|
|
|
Post by mpchi on Aug 10, 2023 23:17:04 GMT -5
Okay, my guess was correct about the Goldion Hammer extension issue. Normally, you may find the Goldion Hammer extension piece (that gives you an extra joint for better articulation) doesn't fit on GFG's arm. This is due to the 4 inner corners not shaped as accurate as they should, blocking the entry. The 4 sides of the main square hole has good clearance (don't need any filing). Simply file down the 4 inner corners slightly, and this will fix it! Use a thin filer if you have one, make the job much easier and less messy, as you don't want to scratch up other areas. 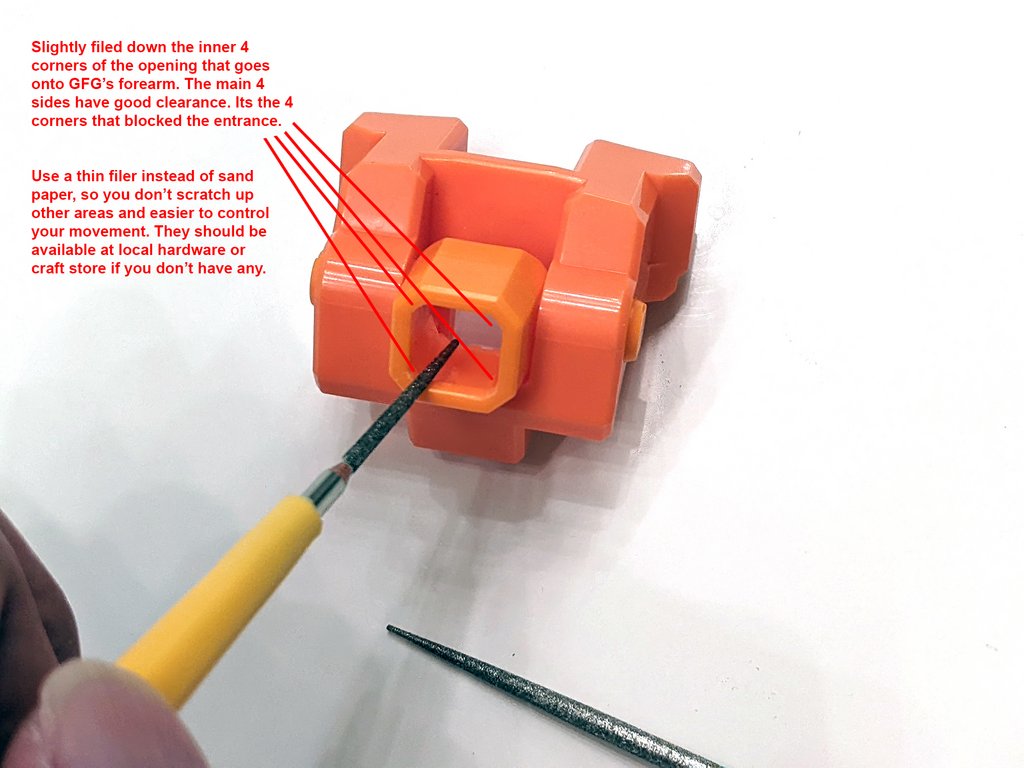  |
|
|
|
Post by mpchi on Aug 11, 2023 2:34:15 GMT -5
It has been a few years since I put the Goldion Hammer on a SOC, and I forgot how freaking heavy this thing is as an attachment. Basically it is stressing every shoulder joint, elbow, the Hammer extension connection, the extension clip that hooks onto Goldy's crotch, the hammer hand wrist, the inner palm clip grabbing onto the Hammer, the mid hammer joints, and the plastic 'cup' that holds the end tip of the hammer on the display stand. Basically, it is a stress galore. Any of those plastic part cracks or breaks, the whole thing is going to tumble down and commit suicide. Also, because of the weight, GFG will want to turn a bit towards his right, and even occasionally untab its waist/torso swivel lock, thanks to the display stand somehow like to tilt the figure a bit backwards (same with my GGG and its older black GGG display stand). If you choose to use Goldy's optional bigger hand, it looks better, but you lose the clip on the palm, causing the Marghand slide around the hammer handle, which render the display less stable. All in all, this is a scary display, and super heavy too at 2.21KG with the stand. Not something I would recommend to keep in display like this for long term. However... it is cool as hell! Even though GFG has some proportion issues, it looks much better and very imposing once you put the Hammer on and spread out the wings. SUCH SHELF PRESENCE! Posting this grainy night photo of the thing, but look sooooo much better in person. For a moment, looking at this temporary wiped out all my concerns of the flawed GFG, and just enjoy the awesome combination in front of me. GOOOOOLDIONN HAAAAAAAAAAMMMMMMAAAAAAAAA~!!!
 |
|
|
|
Post by Gold on Aug 12, 2023 1:01:44 GMT -5
Thanks for the great, in-depth solutions MPchi.  Sad to hear so many issues with the GFG, now I'm kinda less excited for this release. It hasn't arrived locally here in Manila yet. Gold |
|
|
|
Post by mpchi on Aug 12, 2023 2:03:34 GMT -5
Thanks for the great, in-depth solutions MPchi. Sad to hear so many issues with the GFG, now I'm kinda less excited for this release. It hasn't arrived locally here in Manila yet. Gold It may seem so initially, but it is not that bad. The really main issue is the hips (and don't think we can do much about that, aside being careful when moving them). Most of the others are easily fixable, or can overlook. Head is a bit too big, but even that is personal preference. |
|
|
|
Post by GetterBoi on Aug 12, 2023 9:05:03 GMT -5
I prob won't receive my copy of GFG until September or October. Thanks for all the detailed info, mpchi. |
|
|
|
Post by xephon0930 on Aug 12, 2023 19:42:47 GMT -5
It has been a few years since I put the Goldion Hammer on a SOC, and I forgot how freaking heavy this thing is as an attachment. Basically it is stressing every shoulder joint, elbow, the Hammer extension connection, the extension clip that hooks onto Goldy's crotch, the hammer hand wrist, the inner palm clip grabbing onto the Hammer, the mid hammer joints, and the plastic 'cup' that holds the end tip of the hammer on the display stand. Basically, it is a stress galore. Any of those plastic part cracks or breaks, the whole thing is going to tumble down and commit suicide. Also, because of the weight, GFG will want to turn a bit towards his right, and even occasionally untab its waist/torso swivel lock, thanks to the display stand somehow like to tilt the figure a bit backwards (same with my GGG and its older black GGG display stand). If you choose to use Goldy's optional bigger hand, it looks better, but you lose the clip on the palm, causing the Marghand slide around the hammer handle, which render the display less stable. All in all, this is a scary display, and super heavy too at 2.21KG with the stand. Not something I would recommend to keep in display like this for long term. However... it is cool as hell! Even though GFG has some proportion issues, it looks much better and very imposing once you put the Hammer on and spread out the wings. SUCH SHELF PRESENCE! Posting this grainy night photo of the thing, but look sooooo much better in person. For a moment, looking at this temporary wiped out all my concerns of the flawed GFG, and just enjoy the awesome combination in front of me. GOOOOOLDIONN HAAAAAAAAAAMMMMMMAAAAAAAAA~!!!
So far it hasn't been an issue cause I have kept it static and on a stand for most the time without messing around too much. I usually take the whole thing off hammer and all by carefully pulling out the two by the connections,holding only the elbow specifically. Also,I am warning you guys about the ball joints for the Hell and Heaven Shoulder Parts for Gaofighgar as the chest pieces for one of them broke on mine and I had to super glue it back and sand off the ball joint as it has trouble still getting inside the socket. Be sure not to force it and shave down with some sand paper carefully and slowly if it gives issues. |
|
|
|
Post by mpchi on Aug 12, 2023 19:53:02 GMT -5
...Also,I am warning you guys about the ball joints for the Hell and Heaven Shoulder Parts for Gaofighgar as the chest pieces for one of them broke on mine and I had to super glue it back and sand off the ball joint as it has trouble still getting inside the socket. Be sure not to force it and shave down with some sand paper carefully and slowly if it gives issues. Sorry to hear that the chest piece broke. Man, one thing after another. |
|
|
|
Post by xephon0930 on Aug 12, 2023 23:02:47 GMT -5
...Also,I am warning you guys about the ball joints for the Hell and Heaven Shoulder Parts for Gaofighgar as the chest pieces for one of them broke on mine and I had to super glue it back and sand off the ball joint as it has trouble still getting inside the socket. Be sure not to force it and shave down with some sand paper carefully and slowly if it gives issues. Sorry to hear that the chest piece broke. Man, one thing after another. Yeah. And paint is really being the usual as it is wearing quick. |
|


