Post by quinjester on Jan 10, 2009 13:59:47 GMT -5
... okay, so it's a really kitchy title, but as I wrote this up for a friend on another board, I thought I might as well put it here too for anyone out there with a broken Gaigar knee in honor of the upcoming metal-kneed V2.0 coming out.
I would never have thought to do this if I hadn't read wilson's comment in the "CM's is a very customer friendly company" thread a year or so ago, so all original credit can be winged his way. I just expanded on it a little.
----------------
Legend of Brave Knee Revival Surgery
What you'll need: A hobby knife, sandpaper, and set of small jeweler's screwdrivers (obtainable anywhere, practically. An assortment of small screwdrivers, both flat and phillips. A necessity for any toy owner who intends to do repairs and maintenance). You'll also need a pin vise (the little pen-drill below):
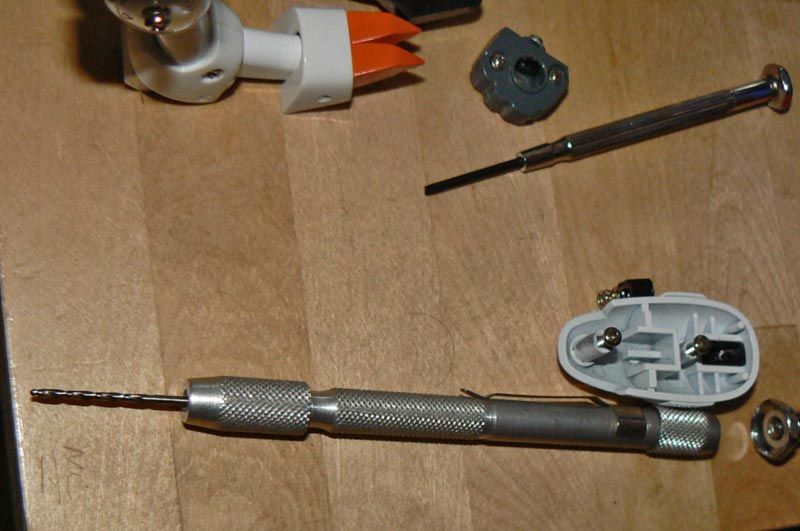
You'll probably need to go to a hardware or hobby store for one of these. The drill bits it comes with may also be a little too small. Dremel bits will fit in a pin vise by putting a dremel locking grip inside it, so if you have one of those around, you should be set.
IMPORTANT CAVEAT:
Please note that this guide is written at least a year after the fact of the initial surgery, so I don't have any "in progress" shots sadly, or specific styles and sizes of screw or washer to use. Any damage incurred to your own toys following this brief guide is a sad sad thing but not my fault, unless I actually came over to your house and broke them, in which case I'll compensate you, sorry. Still, it should hopefully be of some use to those of us who have seen this happen:
(Photo by Gold from RJ boards)
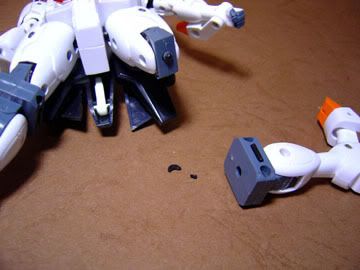
Step 1: Taking the leg apart
Nothing complicated. Just two screws on the inner thigh and you'll have this. Pieces that will likely fall out/fly away at this stage: semicircular black fill piece in the upper thigh and the ratchet pin. Don't do this over a shag carpet.
Slip the knee hinge off of the peg and continue to...
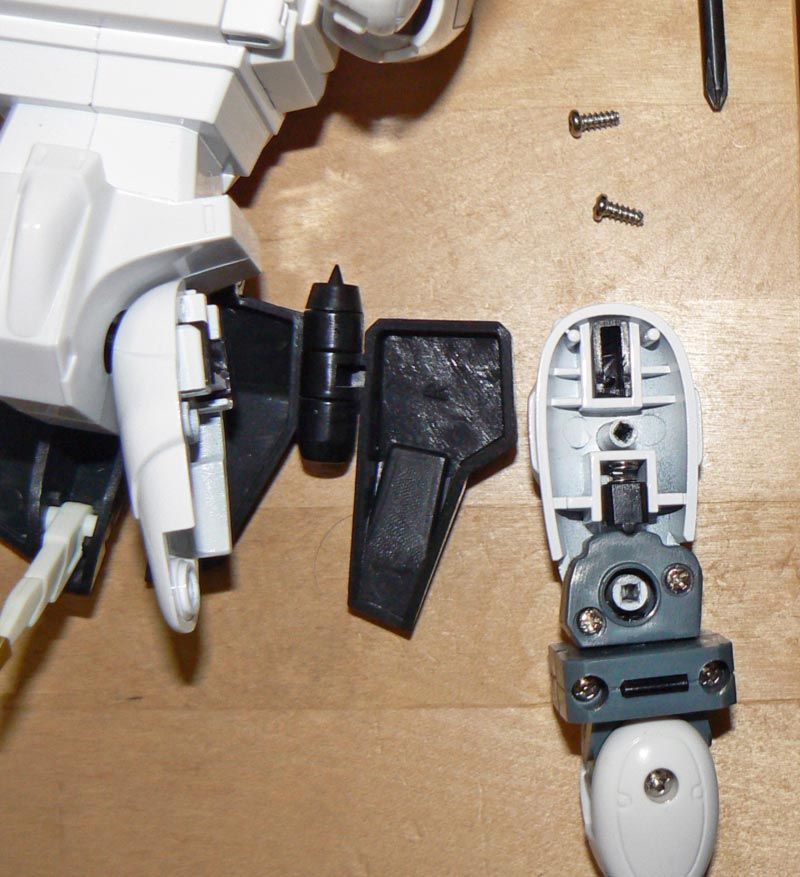
Step 2: Freeing the Lower knee joint
You don't have to disassemble the entire lower leg to get the lower knee joint free. In fact, chances are if you're using this guide, you may think you don't have to do it at all because the knee probably isn't attached to the lower leg at this point. However, you'll need to get the joint back in at some point, so you may as well do it now. Unscrew the upper screw enough so that it releases it's grip on the opposite side and the spring inside the calf will pop the legs apart. Shake out any bits of old-knee-debris that might be rattling around in there.
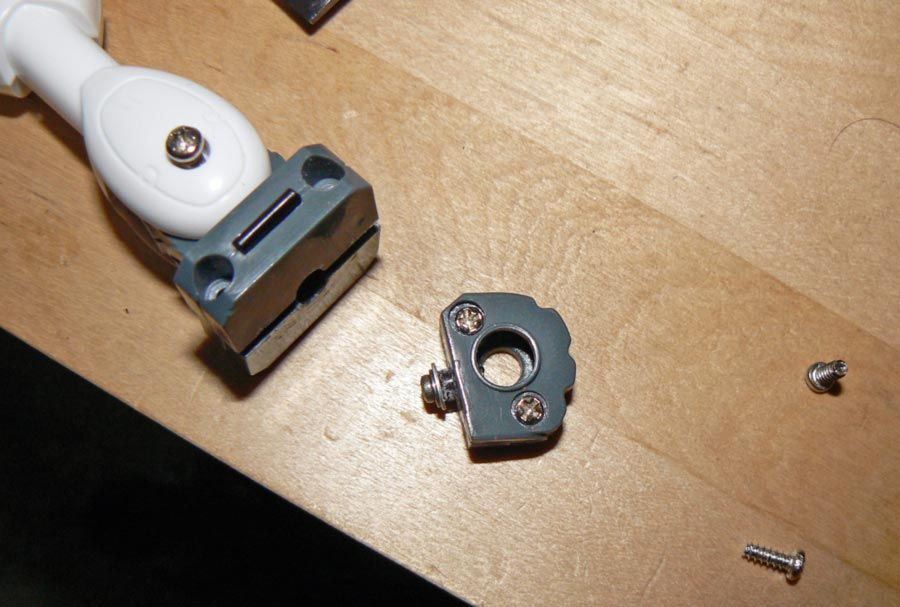
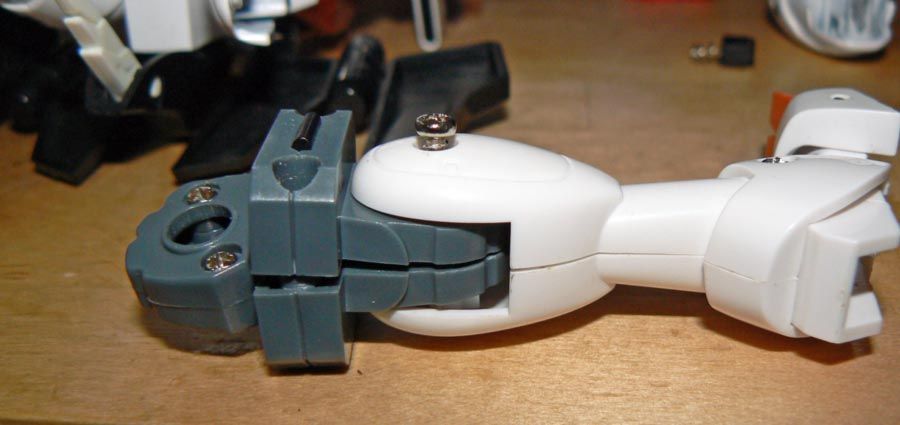
Here we have the freed kneejoint. This is what the repaired GGG Knee block will look like.
Take care to try and keep the various screws that will be piling up separate from each other, and ideally half-screwed back into their respective locations, as they're all different. Now, unscrew the two screws holding the knee block together to free the offending broken pin. It's likely it will still remain stuck together, however it's not glued, and can be popped apart by pushing on the inside of the knee block through the pin hole to get the pieces split slightly, then worked apart with a flathead jewler's screwdriver.
(Photo by Gold from RJ forums)
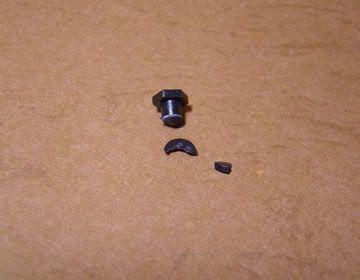
The offending piece. Try to resist the temptation to smash it in rage or do any additional damage to it because this will be the focus of the surgery.
Step 3: Finding a good sized replacement screw and washer set
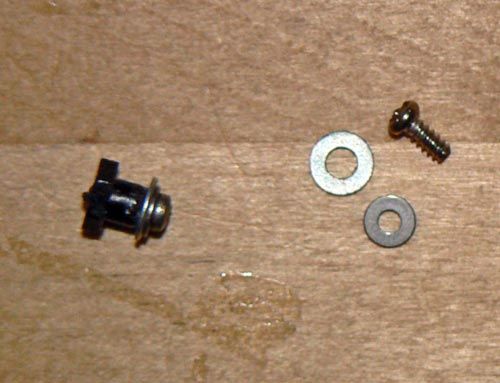
Adventure time! Take your newly freed knee pin to your local hardware store (you may need to try a few; miniscule screws and washers apparently aren't in high demand) and start looking for the smallest screws and washers you can find. You don't want the biting washers, the ones that have a cut in them and look slightly warped. It helps if you disassemble the unbroken knee of your Gaigar figure and take the unbroken peg with you so you can see generally how big of a washer you'll need to find to replace the missing part.
Chances are you will not be able to find a perfect washer/screw combination, as in my case after searching three hardware stores, I couldn't find a screw that was perfectly sized that didn't have a matching washer that was too small. That's fine, really, as you can always do as I've done and use the smaller washer to hold a larger one in place. You'll want a screw that's fairly low profile, not too long (it doesn't matter too much if it's longer than the knee pin, but if it's too long you WILL have to cut it down), and not too broad, as you don't want it to weaken the outer walls of the knee pin and allow it to split or break.
Screws and washers are cheap. Buy an assortment; nothing wrong with having spares. I ended up using my spare washers as metal reinforcements for the unbroken knees of all of my Gaigar figures; I don't know if it actually helps, but they haven't broken yet, and it at least gave me a little piece of mind.
Step 4: Cleaning away the detritus
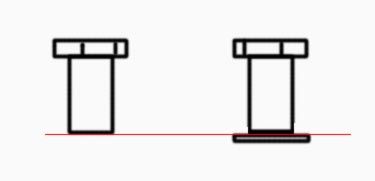
Using a hobby knife and an unbroken knee pin (if available) as reference, cut away the broken part of the knee pin. Try not to cut too much away in one go; you can always cut again to make it shorter - making it longer is the hard part so take your time whenever possible. Use low or medium grit sandpaper (an emery board or nail file also works; you don't have to be clean and fancy) to try and get cut surface as flat and perpendicular as possible. The idea is that you're trying to get a cut surface as close to base point of where the plastic disc USED to be:
Step 5: Drilling
This is where hopefully you bought a few different sizes of screws (or at least took your pin vise with you to the hardware store), because you'll want to drill a hole that's just the right size for the screw you've chosen. Try to drill as straight as possible, and again make sure to always take your time. If anything, you want your hole to be slightly smaller than the screw as opposed to larger; again, you can always make holes bigger and cut more away; it's putting it back that's the problem.
Step 6: Testing
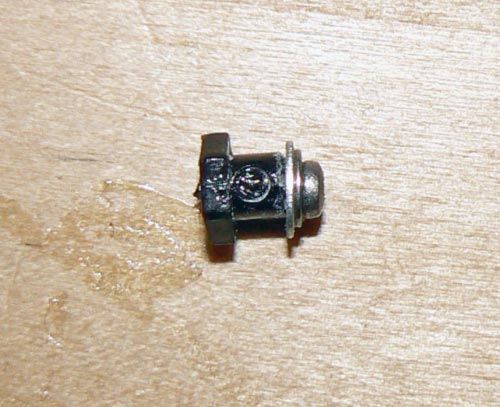
Ignore the Future residue on my worktable. Note that my jury rigged pin isn't perfectly aligned; chances are yours wont be either. That's totally okay though.
Screw your washer/screw assembly into the knee pin and give it a test. You may very well need to take the whole deal apart again and sand the pin down more to get the knee joint so it's tight and doesn't "wobble". Just keep experimenting and testing until you get it to be a comfortable fit. You probably don't want it to be TOO tight, as you don't want the pressure on the washers to cause the screw to turn when you rotate the knee; you'll end up either biting into the plastic and potentially breaking the knee retainer or loosening the knee pin so that it starts flopping around again.
Chances are the knee will never be 100% the way it was again (as with all major joint surgery), but with patience you can easily get 90-95%, and you shouldn't* have to worry about it breaking anymore. The screw will be a bit taller than the original pin, as well, which will press into the spring on the inside of Gaigar's calves, but this shouldn't effect the figure much if at all. You may want to give the pin and connecting surfaces a light coating of future floor polish or nail polish to give a bit more friction to compensate for any looseness that may still remain.
* Never is a long time. You should still always take the same precautions as before with the knee joints of the Gaigar figures; always push the feet out from below on GGG and use a small screwdriver to pry the knees out via the screwholes on GGGG)
Step 7: Reassembly and Rejoicing
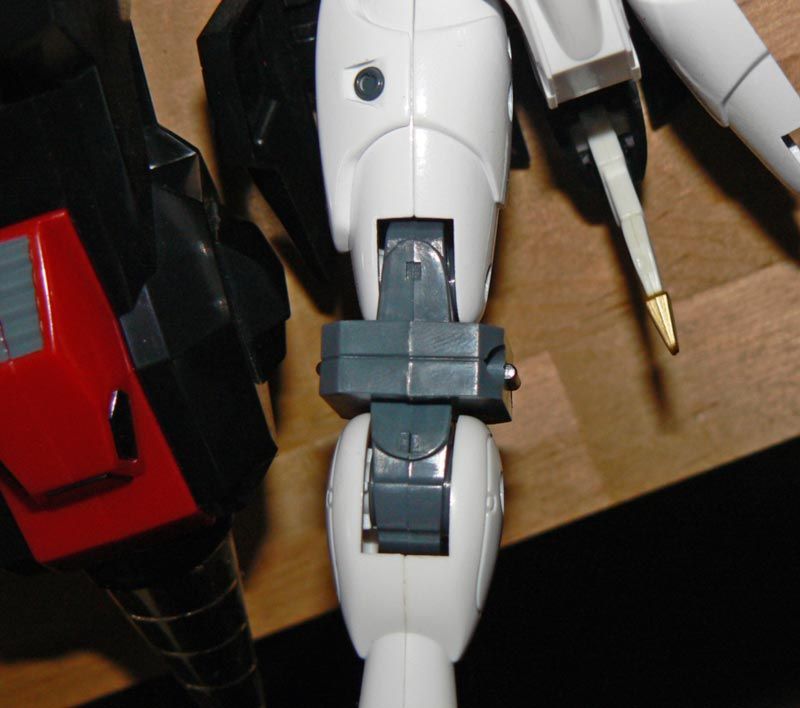
When putting the whole deal back together, make sure that the knee blocks line up like so; the square detented details should both be on the same side. There's nothing quite like putting your repaired figure back together just to realize that you have to take it back apart again because it's backwards.
What I did at this point was I took my extra washers and opened up all of my other Gaigar knee joints to superglue them to the underside of the pin; essentially doubling the thickness of the disc with a steel reinforcement. Does this help prevent breakages? I honestly have no clue, and I'm not about to start yanking on the knees of my figures to see if they're any more resiliant :lol, but it doesn't harm the figure in any way, at the very least, and in theory it should strengthen the joint as a whole.
... Right! Hopefully that helped some poor souls with broken knees get onto the path to joyful reunion with an unbroken toy. I'm going to go put my dismembered GaoGaiGar back together now :lol
I would never have thought to do this if I hadn't read wilson's comment in the "CM's is a very customer friendly company" thread a year or so ago, so all original credit can be winged his way. I just expanded on it a little.
----------------
Legend of Brave Knee Revival Surgery
What you'll need: A hobby knife, sandpaper, and set of small jeweler's screwdrivers (obtainable anywhere, practically. An assortment of small screwdrivers, both flat and phillips. A necessity for any toy owner who intends to do repairs and maintenance). You'll also need a pin vise (the little pen-drill below):
You'll probably need to go to a hardware or hobby store for one of these. The drill bits it comes with may also be a little too small. Dremel bits will fit in a pin vise by putting a dremel locking grip inside it, so if you have one of those around, you should be set.
IMPORTANT CAVEAT:
Please note that this guide is written at least a year after the fact of the initial surgery, so I don't have any "in progress" shots sadly, or specific styles and sizes of screw or washer to use. Any damage incurred to your own toys following this brief guide is a sad sad thing but not my fault, unless I actually came over to your house and broke them, in which case I'll compensate you, sorry. Still, it should hopefully be of some use to those of us who have seen this happen:
(Photo by Gold from RJ boards)
Step 1: Taking the leg apart
Nothing complicated. Just two screws on the inner thigh and you'll have this. Pieces that will likely fall out/fly away at this stage: semicircular black fill piece in the upper thigh and the ratchet pin. Don't do this over a shag carpet.
Slip the knee hinge off of the peg and continue to...
Step 2: Freeing the Lower knee joint
You don't have to disassemble the entire lower leg to get the lower knee joint free. In fact, chances are if you're using this guide, you may think you don't have to do it at all because the knee probably isn't attached to the lower leg at this point. However, you'll need to get the joint back in at some point, so you may as well do it now. Unscrew the upper screw enough so that it releases it's grip on the opposite side and the spring inside the calf will pop the legs apart. Shake out any bits of old-knee-debris that might be rattling around in there.
Here we have the freed kneejoint. This is what the repaired GGG Knee block will look like.
Take care to try and keep the various screws that will be piling up separate from each other, and ideally half-screwed back into their respective locations, as they're all different. Now, unscrew the two screws holding the knee block together to free the offending broken pin. It's likely it will still remain stuck together, however it's not glued, and can be popped apart by pushing on the inside of the knee block through the pin hole to get the pieces split slightly, then worked apart with a flathead jewler's screwdriver.
(Photo by Gold from RJ forums)
The offending piece. Try to resist the temptation to smash it in rage or do any additional damage to it because this will be the focus of the surgery.
Step 3: Finding a good sized replacement screw and washer set
Adventure time! Take your newly freed knee pin to your local hardware store (you may need to try a few; miniscule screws and washers apparently aren't in high demand) and start looking for the smallest screws and washers you can find. You don't want the biting washers, the ones that have a cut in them and look slightly warped. It helps if you disassemble the unbroken knee of your Gaigar figure and take the unbroken peg with you so you can see generally how big of a washer you'll need to find to replace the missing part.
Chances are you will not be able to find a perfect washer/screw combination, as in my case after searching three hardware stores, I couldn't find a screw that was perfectly sized that didn't have a matching washer that was too small. That's fine, really, as you can always do as I've done and use the smaller washer to hold a larger one in place. You'll want a screw that's fairly low profile, not too long (it doesn't matter too much if it's longer than the knee pin, but if it's too long you WILL have to cut it down), and not too broad, as you don't want it to weaken the outer walls of the knee pin and allow it to split or break.
Screws and washers are cheap. Buy an assortment; nothing wrong with having spares. I ended up using my spare washers as metal reinforcements for the unbroken knees of all of my Gaigar figures; I don't know if it actually helps, but they haven't broken yet, and it at least gave me a little piece of mind.
Step 4: Cleaning away the detritus
Using a hobby knife and an unbroken knee pin (if available) as reference, cut away the broken part of the knee pin. Try not to cut too much away in one go; you can always cut again to make it shorter - making it longer is the hard part so take your time whenever possible. Use low or medium grit sandpaper (an emery board or nail file also works; you don't have to be clean and fancy) to try and get cut surface as flat and perpendicular as possible. The idea is that you're trying to get a cut surface as close to base point of where the plastic disc USED to be:
Step 5: Drilling
This is where hopefully you bought a few different sizes of screws (or at least took your pin vise with you to the hardware store), because you'll want to drill a hole that's just the right size for the screw you've chosen. Try to drill as straight as possible, and again make sure to always take your time. If anything, you want your hole to be slightly smaller than the screw as opposed to larger; again, you can always make holes bigger and cut more away; it's putting it back that's the problem.
Step 6: Testing
Ignore the Future residue on my worktable. Note that my jury rigged pin isn't perfectly aligned; chances are yours wont be either. That's totally okay though.
Screw your washer/screw assembly into the knee pin and give it a test. You may very well need to take the whole deal apart again and sand the pin down more to get the knee joint so it's tight and doesn't "wobble". Just keep experimenting and testing until you get it to be a comfortable fit. You probably don't want it to be TOO tight, as you don't want the pressure on the washers to cause the screw to turn when you rotate the knee; you'll end up either biting into the plastic and potentially breaking the knee retainer or loosening the knee pin so that it starts flopping around again.
Chances are the knee will never be 100% the way it was again (as with all major joint surgery), but with patience you can easily get 90-95%, and you shouldn't* have to worry about it breaking anymore. The screw will be a bit taller than the original pin, as well, which will press into the spring on the inside of Gaigar's calves, but this shouldn't effect the figure much if at all. You may want to give the pin and connecting surfaces a light coating of future floor polish or nail polish to give a bit more friction to compensate for any looseness that may still remain.
* Never is a long time. You should still always take the same precautions as before with the knee joints of the Gaigar figures; always push the feet out from below on GGG and use a small screwdriver to pry the knees out via the screwholes on GGGG)
Step 7: Reassembly and Rejoicing
When putting the whole deal back together, make sure that the knee blocks line up like so; the square detented details should both be on the same side. There's nothing quite like putting your repaired figure back together just to realize that you have to take it back apart again because it's backwards.
What I did at this point was I took my extra washers and opened up all of my other Gaigar knee joints to superglue them to the underside of the pin; essentially doubling the thickness of the disc with a steel reinforcement. Does this help prevent breakages? I honestly have no clue, and I'm not about to start yanking on the knees of my figures to see if they're any more resiliant :lol, but it doesn't harm the figure in any way, at the very least, and in theory it should strengthen the joint as a whole.
... Right! Hopefully that helped some poor souls with broken knees get onto the path to joyful reunion with an unbroken toy. I'm going to go put my dismembered GaoGaiGar back together now :lol

 Seriously, great job and thanks for the step by step guide Quinjester.