|
|
Post by magengar on Apr 23, 2007 2:19:16 GMT -5
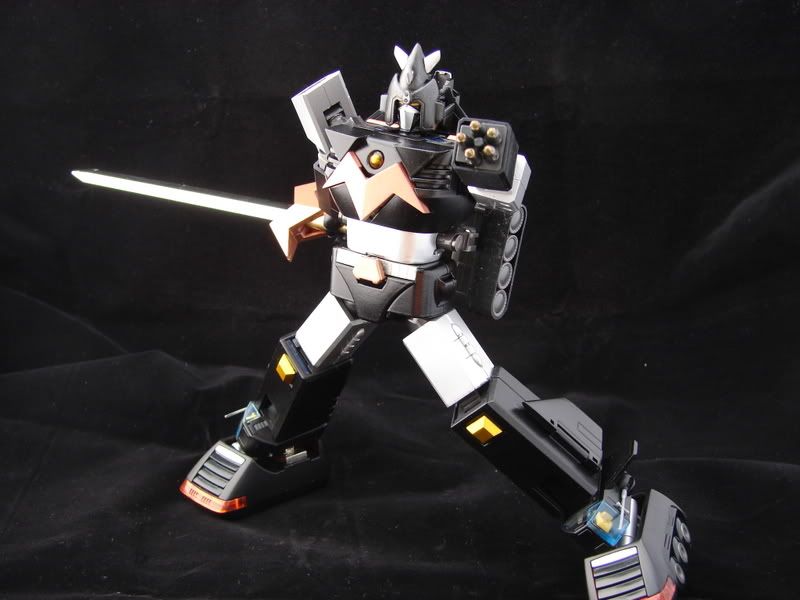
This is a rather looooong "pictorial" of my very first jumbo-customization project. In the future, I may add custom-made accessories to my Chinese Jumbo Mazinger-Z... ...but, for Now, Enjoy! ;D  This is how he looked when I received him from RJ member ICC... His body was all blue, and his limbs and waist were stickered with "metallic" decal paper. He's the same "Jumbo Machinder" Chinese KO figure y'all have seen sold at ebay from that dealer in Thailand(?) Oh well, anyway... ...Welcome to " Toy Eye For The Jumbo Guy " <LOL> ;D     The difference is like Night and Day! ;D zozo-Magengar |
|
|
|
Post by mannix143 on Apr 23, 2007 2:29:21 GMT -5
The color looks much better dude!!! Nicely Done ^_^
what brand are you using for the clear acrylic sealer or finisher?
|
|
|
|
Post by magengar on Apr 23, 2007 2:56:34 GMT -5
These are the spraypaints I used...  In some circumstances, I prefer to use spraypaint so that I can get it on in even coats all around the object I'm painting. But in this case here, with finalizing the "aluminum" topcoat, I had to spray some aluminum paint in a bowl, stir it up, and apply it with a brush; not only to top the coat, but also to create the "weathered" effect. Before I apply the Clear sealer coat, I must fill the robot inside its body with expanding foam... as the foam cures, it will expand to completely fill the inside of the body, and slightly push against the body's walls outwards before it settles. The foam filling will dry rock-hard, making the robot "solid" so that the plastic doesn't cave nor dent inwards causing the paintjob to chip... even then, I will touch the body up with a thin coat of the colors. After all that, I will Then seal it with the Clear acrylic. I still want to continue modifying this jumbo by making it more articulated to accomodate his "IronCutter" accessories, and a custom-made Scrander. Otherwise, I'd leave him alone as he looks Now, and just fill him in and seal him up. Thanks!  zozo-Magengar The color looks much better dude!!! Nicely Done ^_^ what brand are you using for the clear acrylic sealer or finisher? |
|
|
|
Post by TheMazingerZ on Apr 23, 2007 5:36:34 GMT -5
Magangar, I noticed the head and horns are sort of messed up. You can use a hair dryer to fix it back to it's original shape. You can also use hot water by immersing Mazinger's head in the water for a couple of minutes until the vinyl softens up.
}D
|
|
|
|
Post by GEN1AUTOBOT on Apr 23, 2007 6:40:23 GMT -5
Great Job MAG, keep up the good work. I look forward to seeing your accessories upon completion.
|
|
|
|
Post by Godaikin on Apr 23, 2007 7:18:57 GMT -5
really nice looking..............I still have Great Mazinger KO that I am stuck with  it is brand new. |
|
|
|
Post by captainamerica on Apr 23, 2007 7:45:11 GMT -5
Great stuff... night and day is right!!!!
|
|
|
|
Post by magengar on Apr 23, 2007 18:41:08 GMT -5
AhhhhhA! So, You are N.P. over there at yahoogroupMazinger? ;D <LOL> Thanks for the tip, bro! I'm glad you noticed the head warps. I'll try your tips. If all else fails, I'll sculpt a new head from scratch.  zozo-Magengar Magangar, I noticed the head and horns are sort of messed up. You can use a hair dryer to fix it back to it's original shape. You can also use hot water by immersing Mazinger's head in the water for a couple of minutes until the vinyl softens up. }D |
|
|
|
Post by magengar on Apr 23, 2007 18:43:03 GMT -5
Thanks, ICC... check your PM; I wanna liberate you of that Great Mazinger! ;D zozo-Magengar really nice looking..............I still have Great Mazinger KO that I am stuck with it is brand new. |
|
|
|
Post by magengar on Apr 23, 2007 18:45:41 GMT -5
Thanks, Capt! Yep. I'm happy with this custom job. But now the custom bug has bit me good... because I wanna keep chuggin away at this Mazinger if I can make him any better than this. I'll find ways, and I will. zozo-Magengar Great stuff... night and day is right!!!! |
|
|
|
Post by mannix143 on Apr 25, 2007 2:28:48 GMT -5
These are the spraypaints I used... In some circumstances, I prefer to use spraypaint so that I can get it on in even coats all around the object I'm painting. But in this case here, with finalizing the "aluminum" topcoat, I had to spray some aluminum paint in a bowl, stir it up, and apply it with a brush; not only to top the coat, but also to create the "weathered" effect. Before I apply the Clear sealer coat, I must fill the robot inside its body with expanding foam... as the foam cures, it will expand to completely fill the inside of the body, and slightly push against the body's walls outwards before it settles. The foam filling will dry rock-hard, making the robot "solid" so that the plastic doesn't cave nor dent inwards causing the paintjob to chip... even then, I will touch the body up with a thin coat of the colors. After all that, I will Then seal it with the Clear acrylic. I still want to continue modifying this jumbo by making it more articulated to accomodate his "IronCutter" accessories, and a custom-made Scrander. Otherwise, I'd leave him alone as he looks Now, and just fill him in and seal him up. Thanks! zozo-Magengar The color looks much better dude!!! Nicely Done ^_^ what brand are you using for the clear acrylic sealer or finisher? dude, do you need to put the expanding foam first.... does this mean that the clear acrylic sealer makes the toy shrink a little or something that makes the paint chip off? or does it only apply on PVC/plastic hollow ones? i havent bought a sealer yet.... im planning to get one probably later if its not raining yet. or maybe just order online. |
|
|
|
Post by magengar on Apr 25, 2007 3:21:26 GMT -5
The reason I wanna fill it with expanding foam FIRST, is so that
the plastic in some areas of this jumbo does Not cave inwards
when I handle it.
This is a rigid toy, but not as rock-hard like the Mattel/Popy jumbos
we're used to handling.
The foam will harden like an "inner core" so that this toy will not
dent inwards even in the slightest touch... because if if does, the
paint will crack.
Spraypaint an empty pepsi bottle and let it dry.
Now handle it.
See how the paint cracks when ya handle it?
Because the bottle is empty, the plastic is soft-
therefor, the paint will chip and crack.
Now fill the bottle with expanding foam, leave the bottle
uncapped, and let it sit for a few days until it hardens
really solid...
It's hardened...now spraypaint the bottle, let it dry.
Now handle it...
The paint's not crackin Now isn't it.
At this point you can then continue to customize
the bottle.
Well, I'd apply the same principle to All jumbos.
And I'd even fill a Mattel/Popy jumbo with foam, too.
I want my figs to stand SOLID. ;D
zozo-Magengar
|
|
|
|
Post by REX-203 on Apr 25, 2007 19:50:37 GMT -5
Awesome job Magengar! It really does make a huge difference, that I'm sure is even more apparent when seen in real life. |
|
|
|
Post by magengar on Apr 26, 2007 1:41:03 GMT -5
Thanks, Rex! I'm real happy with the results; and I like how the "metal" parts reflect light, while the glossy black just Glistens! I've got the jumbo sittin right beside me at my computer. For now, I'll take a break from the jumbo... but later on, I'd like to start making some custom accessories for him. zozo-Magengar Awesome job Magengar! It really does make a huge difference, that I'm sure is even more apparent when seen in real life. |
|