|
|
GFF 101
May 1, 2008 10:15:41 GMT -5
Post by btoyz on May 1, 2008 10:15:41 GMT -5
hi guys, just started with GFF line. wished i started earlier, some of the models are now HTF. anyways, i noticed some GFF models with white armor parts, the faint panel lines on the white armor are almost always poorly done, sometimes blotchy. from a far they are negligible but at close inspection they look really bad. just on the white armors. the lines on the blue, red and other dark colored armor parts are ok with me.
currently GFF is the best for me, but the messy lines bugs me a lot. some models quality is not acceptable because the lines look horrible. surely the whites will look better without them IMO.
have you guys tried correcting the messy panel lines? like repainting the blotchy area with paint (but avoiding the cool decals). i think the suitable paint must be transparent so that it melds with the white paint. and will even out when you apply a matte topcoat. im thinking of white watercolor or oil paint, both are transparent.
if you did yours, really would like to know how it turned out and what paint did you use.
tnx in advance.
Ed
|
|
|
|
GFF 101
May 3, 2008 20:28:00 GMT -5
Post by admin1 aka Ed on May 3, 2008 20:28:00 GMT -5
Is there any way to just remove or hand polish off the splotchy paint? I'd try to rub/sand off the bad areas then hand rub out the area.
If you post a pic that may help too.
Ed
|
|
|
|
Post by 00silvergt on May 4, 2008 4:24:39 GMT -5
Depends on what they used to line it. If you it is the "Gundam Marker", then you can take that off with rubbing alcohol. Sometimes, with the oils from your finger. If it is paint, then it will depend on what type of paint was used. Admin1 has a point to sand it and do some touch up work, that should work, or heck if worse comes to worst, then repaint and reline.
|
|
|
|
Post by btoyz on May 5, 2008 1:14:33 GMT -5
tnx Ed. here are examples (GFF #0035 Shin Musha Gundam and #0031 Cross Bone Gundam)-   pics from lifezoids gallery. check out the blotchy panel lines on Shin Musha's white head armor, and the dirty panel lines on Cross Bone's shoulder armors. im getting GFF v Gundam with HWS (heavy weapon system) this weekend. its still available here in a local store (many models are already HTF here), and has the most messy panel lines the last time i've seen it in the store. it will do find with my experiment with water color and oil paint. both hobby paints are easy to use even by non-modellers, and both are transparent so its easy to avoid paint mistakes. i will share in-prog pics in the thread guys the soon i get started with it. Ed |
|
|
|
Post by btoyz on Jun 6, 2008 3:38:22 GMT -5
hi guys, time to update this thread. got recently GFF Crossbone Gundam from a friend. the same time i also bought this gundam marker set made by Gunze Sangyo. Gundam Marker: Seed Destiny Marker Set (roughly 16 USD)-  to continue with the topic, i gave the gundam markers a try. and they work well! here's what i did- it was easy touching up the whites with the white gundam marker. shake the pen a little to mix the paint inside the marker. it has a metal ball inside like the ones in spray paint cans. then rub on. i did circular motion, but not too much. if the mistake is covered, i stop. i was also careful in avoiding the markings on the model. i basically retouched everything that i dont like on the white armor. the white paint levels out fine, and dries flat. which is great! this is what i like with Gunze Sangyo paints, they level up very well. i retouched the excess faint blue and brown panel lines but left out the color inside the panel lines, retouched paint scrapes, some of the dirty looking light brown wash, and some paint mistakes on the borders. because i want the skull design on the chest armor clean, i repainted it with the white marker, but left out a little wash on the teeth part. then i turned on the X-shaped thrusters, some of the yellow paint on the many exhaust were a little out of border. it was easy retouching em with the white marker. "BUT i was careful not to run the marker too often". the paint from the white marker flows easily! making sure i got it at 1 run (2 runs at most). and because the white paint can easily built up on the surface, it can bleed/run on the yellow inside the exhaust. this happened on mine, so i retouched this bleed after the white paint is dry, with the yellow marker. the whites were easy, but a steady hand is needed in repairing the crooked edges on the darker colors. like the blue on GFF crossbone's shoulder armor. i assembled XM-X1 crossbone, so i needed a more darker blue. but the gundam marker set came with a light and medium blue marker. so i used the black marker instead. i repaired the crooked edges, the same time the black line doubles up like a panel line border on the blues. i also made some foul ups, going out of border. it was very easy to make mistake with dark colors! i let the black paint dry, then retouched the white border with the white marker. so this is important: "always let the first paint dry, then retouch it with the other color". this is how paint mistakes can be corrected. retouching paint that is not dry will result in a gooey mess, and may also ruin the tip of the marker specially the white, by tainting the tip with other color. i also used the black marker in defining the border of the skull design and yellow exhaust on the chest. removing those mini paint mistakes on the borders. i was very happy with the result! that's about it with GFF crossbone's minor paint issues. the leg paint apps were ok, the full cloth armor were ok. everything was fine. here are some pics and descriptions on what i did-  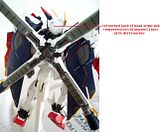 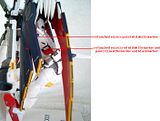 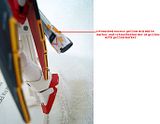  finish, GFF Crossbone XM-X1 Full Cloth-  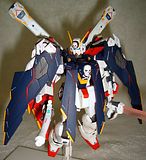 the process took me a few hours, including assembly of the model. overall i was happy with the result of using the gundam markers. IMO a light coat or two of matte topcoat will improve the look more and make the finish of the model perfect. and the topcoat will seal and protect what i've done, sadly i dont have a can right now, but will post new pics after i topcoat it. gundam markers are definitely easy to use in fine tuning the paint apps of GFF. -Ed |
|
|
|
Post by zephyranthes on Jun 7, 2008 0:50:48 GMT -5
I'm aware that some paints chemically react with PVC--melting it after a while. Years ago I tried to touch up a PVC Banpresto Gundam figure with plastic model paint only to discover later that the touched up areas were liquefying. Wrong kind of paint + certain plastics=disaster. I hope that this doesn't happen to you.
|
|
|
|
Post by btoyz on Jun 7, 2008 8:03:05 GMT -5
i was a modeller before i collected figures, and i haven't seen any hobby paint melting/liquefying a plastic model. tnx for the concern anyways (",)
-Ed
|
|
|
|
GFF 101
Jun 7, 2008 19:42:55 GMT -5
Post by MechaShiva on Jun 7, 2008 19:42:55 GMT -5
I'm aware that some paints chemically react with PVC--melting it after a while. Years ago I tried to touch up a PVC Banpresto Gundam figure with plastic model paint only to discover later that the touched up areas were liquefying. Wrong kind of paint + certain plastics=disaster. I hope that this doesn't happen to you. Enamel will liquify PVC. You need to use acrylic, only. For ABS/Stryrene (the hard stuff) you can use pretty much anything. |
|
|
|
Post by btoyz on Jun 8, 2008 9:15:23 GMT -5
dont know about household or industrial enamel, i dont use them. but base on my own experience, i've used Tamiya and Humbrol Enamel with figures with PVC parts before and they were fine. here's a good example. this figure is a commision work i did for a friend so many years ago- McFarlane Lotus Angel 2  a file photo from Spawn.com modded her a little. all of her accessories are made with rubbery PVC. i painted her and everything with Tamiya and Humbrol Enamels, and Gunze Sangyo Mr Color paints. Gunze Sangyo is also labeled as synthetic lacquer, which is stronger than enamel. finish model-   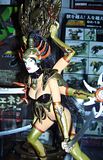 i was satisfied with the finish. my friend still has the figure, and he still says to me that it's one of his most favorite painted figure (",) i've painted other figures too with rubbery PVC using these hobby paints, also with other paints like Tamiya and Vallejo acrylics, artist acrylics (in tubes) and artist oils, and they were fine. really never experience this melting/liquefying. Enamel will liquify PVC. You need to use acrylic, only. For ABS/Stryrene (the hard stuff) you can use pretty much anything. hi bro, what brand of enamel that does this melting and liquefying? -Ed |
|
|
|
GFF 101
Jun 8, 2008 19:28:02 GMT -5
Post by MechaShiva on Jun 8, 2008 19:28:02 GMT -5
Btoyz---Actually, I should've been more specific about they type of paint being safe on abs/styrene. I meant any kind of hobby paint. (There's probably some industrial stuff that would destroy it.)
As far as the enamels eating through acrylic---I've never actually tried it. ;D I'm just going on what vinyl-figure builders usually say---that hobby enamel reacts badly to the figures.
But the pvc they're involved with is from limited run vinyl models--usually movie and superhero related. I guess some of the rubbery pvc in action figures might be chemically different somehow.
But it's good to know certain lines of figures are safe with those brands of paint you mentioned. Thanks for the info!
Nice job on the panel lines and repaints, btw.
|
|
|
|
GFF 101
Jun 8, 2008 19:31:48 GMT -5
Post by moleman on Jun 8, 2008 19:31:48 GMT -5
What do you guys use to remove paint from figures that are mostly PVC without damaging it?
|
|
|
|
GFF 101
Jun 8, 2008 23:49:41 GMT -5
Post by zephyranthes on Jun 8, 2008 23:49:41 GMT -5
The problem I had was with PVC not ABS plastic. I'm also interested to know what can be used to safely remove paint from PVC.
|
|
|
|
Post by btoyz on Jun 9, 2008 0:32:18 GMT -5
tnx MechaShiva. i guess your right on limited/garage vinyl kits, they might be chemically different from the PVC in action figures, and might react negatively with enamel and lacquer. acrylic may be the safest on these models because its water base. i also dont recommend using household and industrial paints/spray paints on models because they are stronger and have thicker color pigments that might ruin your models. i've only used Tamiya, Humbrol and Gunze Sangyo most of the time, and i swear by them. they're the right stuff on your models. -Ed EDIT:i checked the boxes of GFF, looking for materials used in GFF. on the bottom of the box i read "PET"- 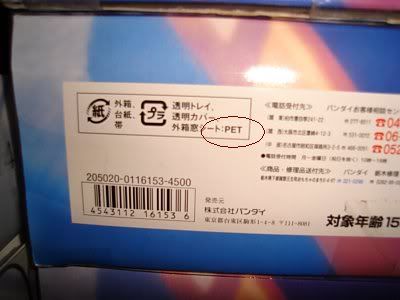 after a quick research in Wiki - PET stands for Polyethylene terephthalate. a thermoplastic polymer resin, or plastic resin. uses: PET can be semi-rigid to rigid, depending on its thickness, and is very lightweight. It makes a good gas and fair moisture barrier, as well as a good barrier to alcohol and solvents. It is strong and impact-resistant. It is naturally colorless with high transparency. when filled with glass particles or fibers, it becomes significantly stiffer and more durable. on the other hand, PVC (Polyvinyl chloride) is a widely used thermoplastic polymer (and not a resin). uses: as a building material - PVC is cheap, durable, and easy to assemble. it can be made softer and more flexible by the addition of plasticizers. in this form, it is used in clothing and upholstery, and to make flexible hoses and tubing, flooring, to roofing membranes, and electrical cable insulation. it is also commonly used in figurines. to compare the melting points of both: PET - 260 °C PVC - 85 °C IMO PVC is more prone to "melting" than PET, because it has a much lower melting point (",) -Ed |
|
|
|
Post by btoyz on Jun 9, 2008 8:38:28 GMT -5
What do you guys use to remove paint from figures that are mostly PVC without damaging it? hi bro, hope i could help you. in the past i just handbrush over the portion that i want repainted. i used Tamiya or Humbrol enamel, or Tamiya acrylic. but not Gunze Sangyo for being a lacquer type paint, it might eat any paint under it while handbrushing it and leave me a gooey finish that will take forever to dry. but if i airbrush the paint, i can use any paint even Gunze Sangyo. i just spray the stuff in succeeding light coats, letting each layer dry before the next coat. -Ed |
|
|
|
GFF 101
Jun 9, 2008 10:50:21 GMT -5
Post by btoyz on Jun 9, 2008 10:50:21 GMT -5
started with my Full Armor Gundam Mark II (GFF #0019). here's what i've done with G-Defenser: 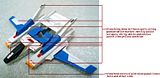 some shiny spots in some areas, these will flatten out when the paint is totally dry. my Gundam Mk-II came with a misaligned V-fin. i removed it carefuly with an x-acto blade, then will re attached it later using CA glue. 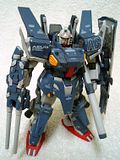  also retouched the V-fin's red part with the red gundam marker, on both sides. when working with mini parts, i always put them on top of a white towel. its easy to spot them this way, also to prevent them from being toss aside and get lost on the floor (",) again, a coat of matte topcoat will further improve the finish of this model, and will seal/protect what i've done with the gundam markers. -Ed |
|
|
|
GFF 101
Jun 10, 2008 5:04:39 GMT -5
Post by btoyz on Jun 10, 2008 5:04:39 GMT -5
re-attached Full Armor Gundam Mk-II's V-fin using CA glue. fixed the crooked blue lights on the chest and bazooka by panel lining with black gundam marker. and could'nt resist it, painted the tip of the head antenna with red gundam marker: 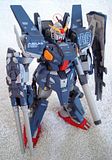 G-Defenser is done too, all the white parts all cleaned up: 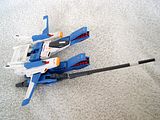 i'm done with this GFF. will topcoat it some other time (",) |
|
|
|
GFF 101
Jun 10, 2008 5:08:09 GMT -5
Post by btoyz on Jun 10, 2008 5:08:09 GMT -5
next, a friend got me GFF #0027 Blue Destiny this week. i'm doing Nimbus' stolen mobile suit, so here are the parts for tweaking, at first glance: head and upper torso- 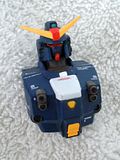 check out that perfect V-fin. as usual the weathered matte blue finish and markings are perfect. little retouching on the white to remove paint scrapes on the edges with white gundam marker. and define the border of the white, probably with black/dark blue panel line using gundam marker. fix the borders of the yellows with dark blue/black panel lines too. would love to drybrush those grey barrels with steel color, using a paintbrush and Humbrol enamel paint. here's a simple example of parts drybrushed with steel enamel paint (circled), works best on "matte" black and dark grey parts-  (a tank model i did many years ago) lower front leg armor- 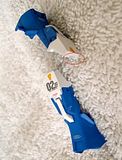 blue finish perfect. fix the border of the whites with white and blue gundam marker, hope my blue marker will match the blue of BD. and check out the circled part, that's a nasty sprue cut mark, on both leg armors. if not fixed these will haunt me forever whenever i look at Blue Destiny. just remove excess plastic by cutting with X-acto blade, sand it a little, then repaint the sanded portion with white gundam marker. shoulder armors-  perfect, just define the panel lines with black gundam marker. boosters-  just clean up the whites and define border using white gundam marker. a black panel line on the border of the whites would look nice too. and probably drybrush the verniers with steel color. skirt armor-  blue finish perfect. just retouch the edges of the red part with red gundam marker, and define border with black/dark blue panel line using gundam marker. hope that's about it to fine tune BD's paint apps (",) -Ed |
|
|
|
GFF 101
Jun 14, 2008 12:11:35 GMT -5
Post by btoyz on Jun 14, 2008 12:11:35 GMT -5
update:  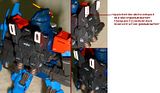 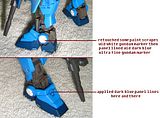 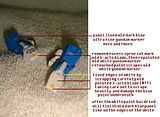 as always, GFF Blue Destiny paint apps is already excellent, except the whites. so tweaking is almost always focused on the whites only. fine tuning Blue Destiny's finish 80% done-  -just waiting for the white paint on the lower front leg armors to dry, then fix border with dark blue panel lines. then it's finish. our objective: minimal effort, maximum results on the final look (",) -Ed |
|
|
|
GFF 101
Jun 16, 2008 9:11:21 GMT -5
Post by btoyz on Jun 16, 2008 9:11:21 GMT -5
update: finished with GFF Blue Destiny's lower front leg armors-  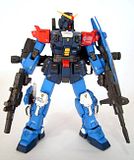 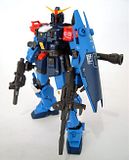 also added more dark blue panel lines everywhere using ultra fine gundam marker. im very satisfied with the results, specially the whites. this project took me roughly 4 hours total, letting the white paint dry before applying the panel lines on the whites. errors with panel lines were fixed by immediate scrapping carefuly with pointed X-acto blade (#11 blade), faster that way. here's a shot with the camera flash- 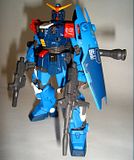 definitely it needs more panel lines, specially on the weapons. and again, a mild coat of matte topcoat will be best to seal everything up. this i will do when i get a can of topcoat spray (",) -Ed |
|
|
|
GFF 101
Jun 17, 2008 1:28:00 GMT -5
Post by btoyz on Jun 17, 2008 1:28:00 GMT -5
final touch ups on GFF Blue Destiny: more panel lines here and there-  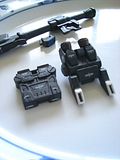 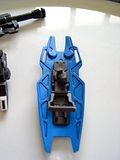 cool touch from the designer, there is a cockpit inside-  panel lined the weapons, and added some simple detail using red gundam marker-  BD finally finish- 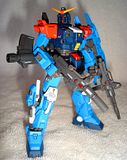 "RX-79BD2 Blue Destiny 2 custom, piloted by Major Nimbus Schterzen during the latter part of the One-Year War. known as the Paladin of Zeon, because of his penchant for melee combat. ready to throw his rifles and pick up his beam saber for close-combat action" (",) |
|