|
|
Post by magengar on Nov 9, 2013 2:14:33 GMT -5
Glad you like my stuff! I need to catch up on those projects, but I've been too lazy; and I also need to upgrade my hardware. lol  zozo-mag ^ I checked out some of your videos. Cool stuff! Back to working on Voltron's face... I'd like to wrap it up within the next week or two, so that I can focus on the rest of the vehicle. |
|
|
|
Post by dudleydrulert on Dec 27, 2013 22:11:46 GMT -5
FYI, this project isn't dead. It's on a hiatus while I work on another custom project that I'll reveal soon.  |
|
|
|
Post by magengar on Dec 28, 2013 2:42:59 GMT -5
Take your time, give us a heads up either way!  zozo-mag |
|
|
|
Post by dudleydrulert on Jan 7, 2014 10:32:23 GMT -5
Vehicle Team Voltron's face is complete, thanks to the talented Ariel Lemon, who made it on commission. 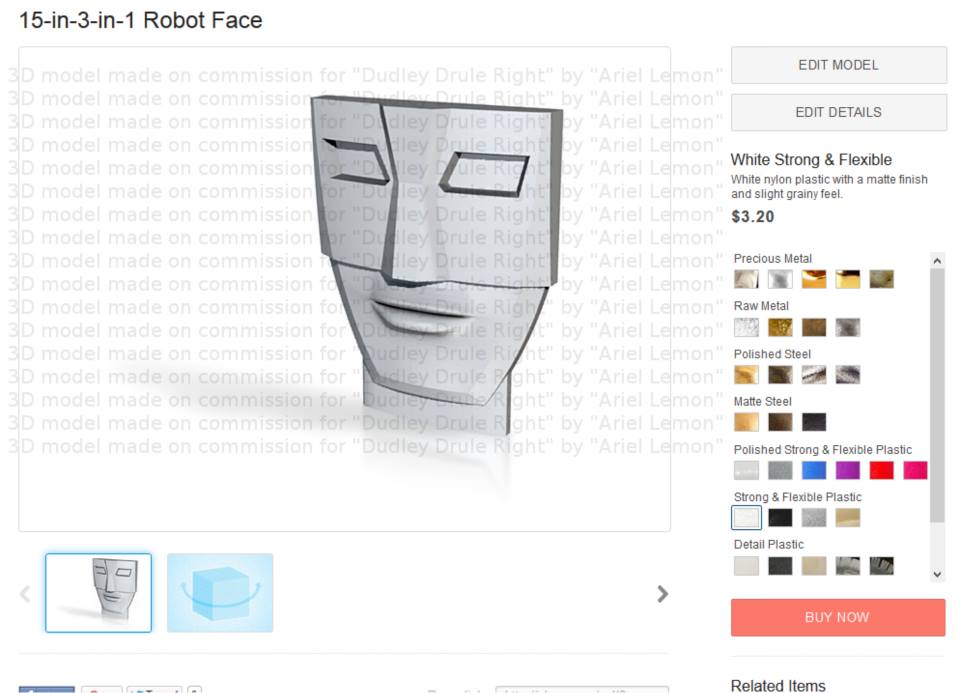 Here is the face "embedded" in the head vehicle mesh, which is still under construction: 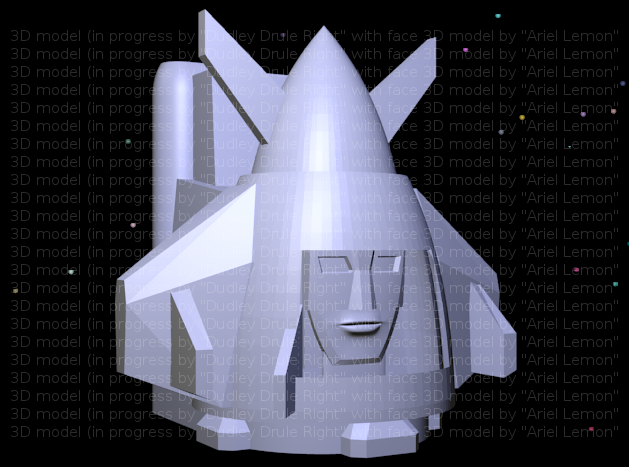 Returning to the head vehicle, I will soon be adding "grooves" at the back of the vehicle -- that is, at the base of Voltron's head -- so that the vehicle can connect to the upper torso vehicle. 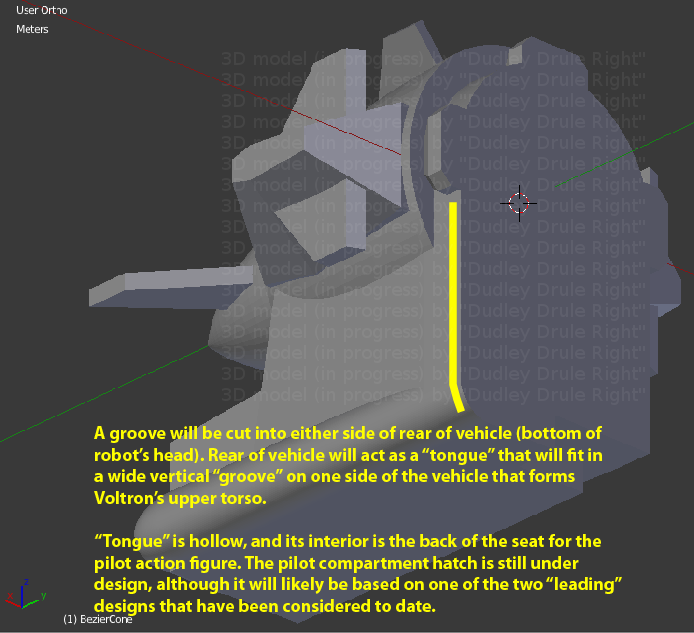 Before I add the grooves, I'll begin to model the twin hatches that conceal Voltron's face. Whereas the Matchbox vehicle's face panels open roughly 50 degrees, in my version the panels will open about 35 to 40 degrees. Doing this will facilitate the design of the pilot compartment hatch. 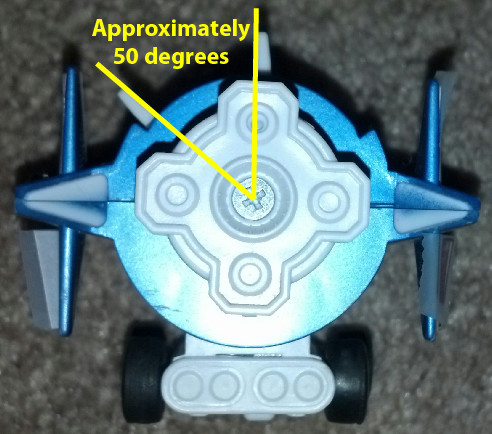 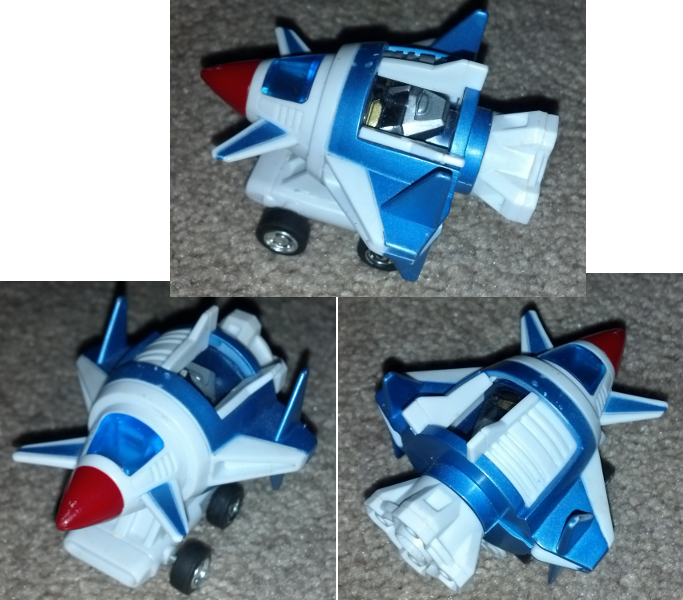 |
|
|
|
Post by dudleydrulert on Jan 15, 2014 23:33:20 GMT -5
I've been working on the designs of the head vehicle's face hatches, plus the pilot compartment hatch. 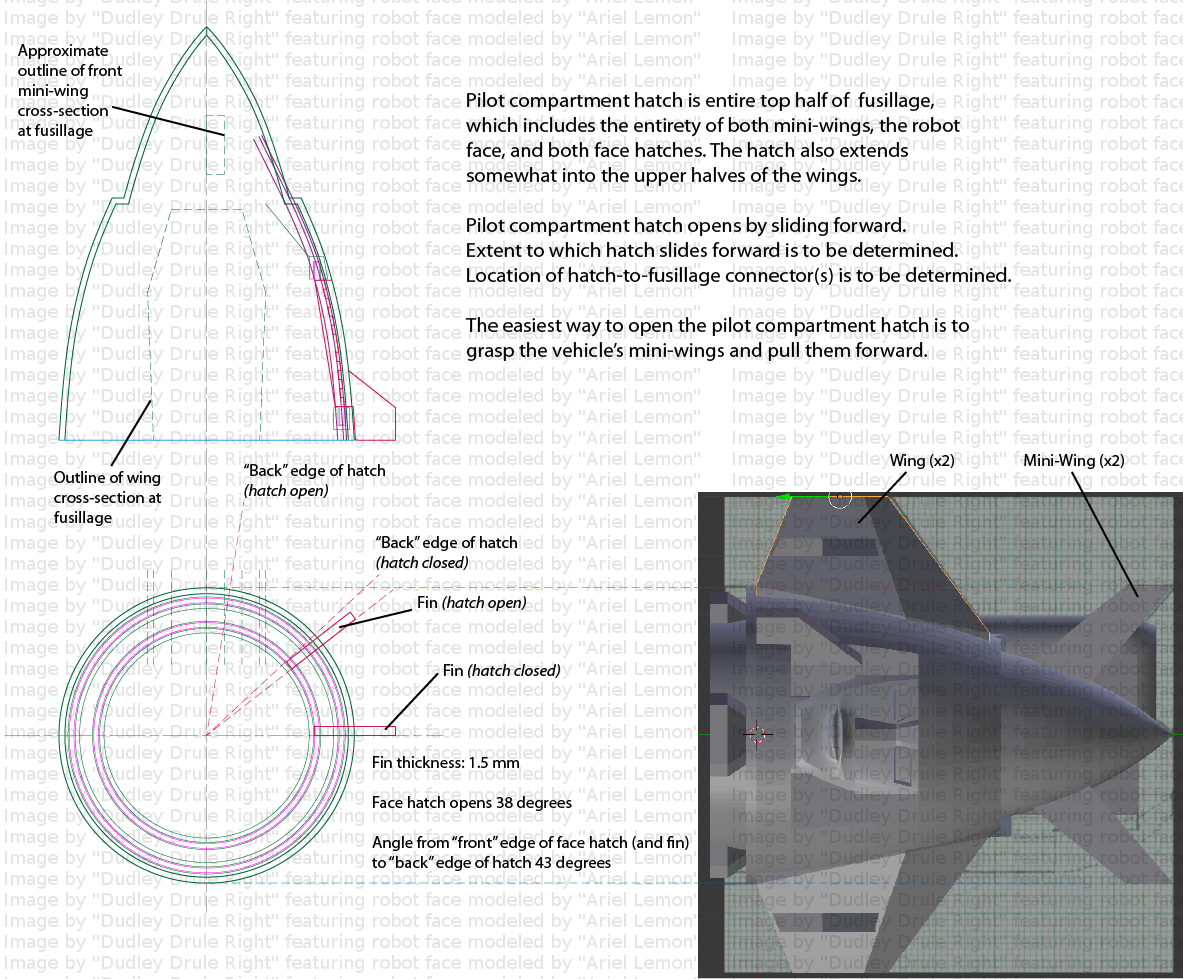 |
|
|
|
Post by magengar on Jan 16, 2014 0:49:28 GMT -5
All that math blows my mind ( I'm mathematically dumb. lol)... Nonetheless, I like how you're working out all those careful details!  zozo-mag |
|
|
|
Post by dudleydrulert on Feb 26, 2014 23:37:55 GMT -5
|
|
|
|
Post by dudleydrulert on Mar 15, 2014 1:25:58 GMT -5
|
|
|
|
Post by xiombarg on Mar 16, 2014 15:20:06 GMT -5
I think half the fun is working on 3D modelling, which is why I keep going back and revising things on my own projects. Having a physical prototype is really cool too, but once I finished casting up my first run of prototypes I realized that I really just wanted to dive back into it and revise some of the features. There are a lot of aspects of a figure that you don't "see" until you start making physical copies, which then turns into, "I should have done this, and I could add that, and what if I put this here...etc."
If you can afford it and if time is not an issue, I highly recommend you just plan to print each piece of the figure at least twice because it's hard to predict a lot of things until you see it for real. The figure I've been working on isn't even close to being as mechanically technical as yours but I still found that several things didn't live up to my expectations. Most of my issues were aesthetic, but a couple of technical as well. But who knows, you might be fine with your first shot. Just something to consider...
|
|
|
|
Post by dudleydrulert on Mar 16, 2014 19:48:45 GMT -5
I have been making test prints of some of the parts. From those tests I redesigned the twin face hatches and surrounding areas. I also just redesigned the wheels and their attachment mechanisms based on the results of a previous test print, and I ordered a new test print of the wheel, axles, etc. Once I'm happy with the wheels, I'll make a print of all parts of the vehicle. I hope but don't expect that they'll all fit together perfectly.  |
|
|
|
Post by xiombarg on Mar 16, 2014 19:52:26 GMT -5
I think half the fun is working on 3D modelling, which is why I keep going back and revising things on my own projects. Having a physical prototype is really cool too, but once I finished casting up my first run of prototypes I realized that I really just wanted to dive back into it and revise some of the features. There are a lot of aspects of a figure that you don't "see" until you start making physical copies, which then turns into, "I should have done this, and I could add that, and what if I put this here...etc." If you can afford it and if time is not an issue, I highly recommend you just plan to print each piece of the figure at least twice because it's hard to predict a lot of things until you see it for real. The figure I've been working on isn't even close to being as mechanically technical as yours but I still found that several things didn't live up to my expectations. Most of my issues were aesthetic, but a couple of technical as well. But who knows, you might be fine with your first shot. Just something to consider... Oops, I hope it was clear that I was talking about my own figure when I said that "it didn't live up to my expectations". |
|
|
|
Post by dudleydrulert on Mar 16, 2014 21:18:07 GMT -5
I understood what you meant.  I 100% agree with you in that test-printing your designs can give you not only insight into whether they actually "work" as real-world objects, but also a different perspective with respect to their aesthetics. After making a test print, I decided to make the "fins" of the head vehicle's twin face hatches 50% thicker. They looked fine on my computer screen, but they looked chintzy in reality.  |
|
|
|
Post by dudleydrulert on Apr 17, 2014 22:09:25 GMT -5
|
|
|
|
Post by xiombarg on Apr 17, 2014 23:49:07 GMT -5
Awesome! Seriously, looks great!
I LOVE it when I get prints in the mail. Especially when it's something I haven't had printed before. It's like Christmas!
So how do you like the fused deposition material for your project?
I'm also curious what the final cost was? The size is relatively large compared to the parts I usually print so it would be interesting to get a comparison cost for size.
|
|
|
|
Post by dudleydrulert on Apr 18, 2014 13:36:19 GMT -5
Thanks!
I'm happy with the material for the most part. This print cost me almost exactly $100.
|
|
|
|
Post by dudleydrulert on May 28, 2014 21:47:08 GMT -5
The design of the head vehicle has been finalized for quite a while. I've been modeling the remaining 14 vehicles. The images below depict the completed head vehicle, plus incomplete "draft" representations of the non-head vehicles, in various configurations, just to test basic sizes, proportions and arrangements. The non-head vehicle designs are in flux, so their dimensions and proportions -- and how they connect to one another -- are likely to change. Having said that, these are decent approximations of what the end result might look like. Keep in mind that this custom toy is being designed to look as though it could have been made as part of the Panosh Place Voltron toy line of the 1980s. Each vehicle will be able to contain a 3-3/4" pilot action figure. In keeping with the style of the Panosh Place toys, the vehicles that form like modules -- such as Voltron's right upper leg and left upper leg -- will be almost identical, differing primarily in color and "plant-on" details that I have not yet modeled. I'm not striving for a "Soul of Chogokin" style. Here are some mockups of the Strato Fighter, Aqua Fighter and Turbo Terrain Fighter.  Here is a mockup of Voltron. (I will be repositioning the legs in the side views.) 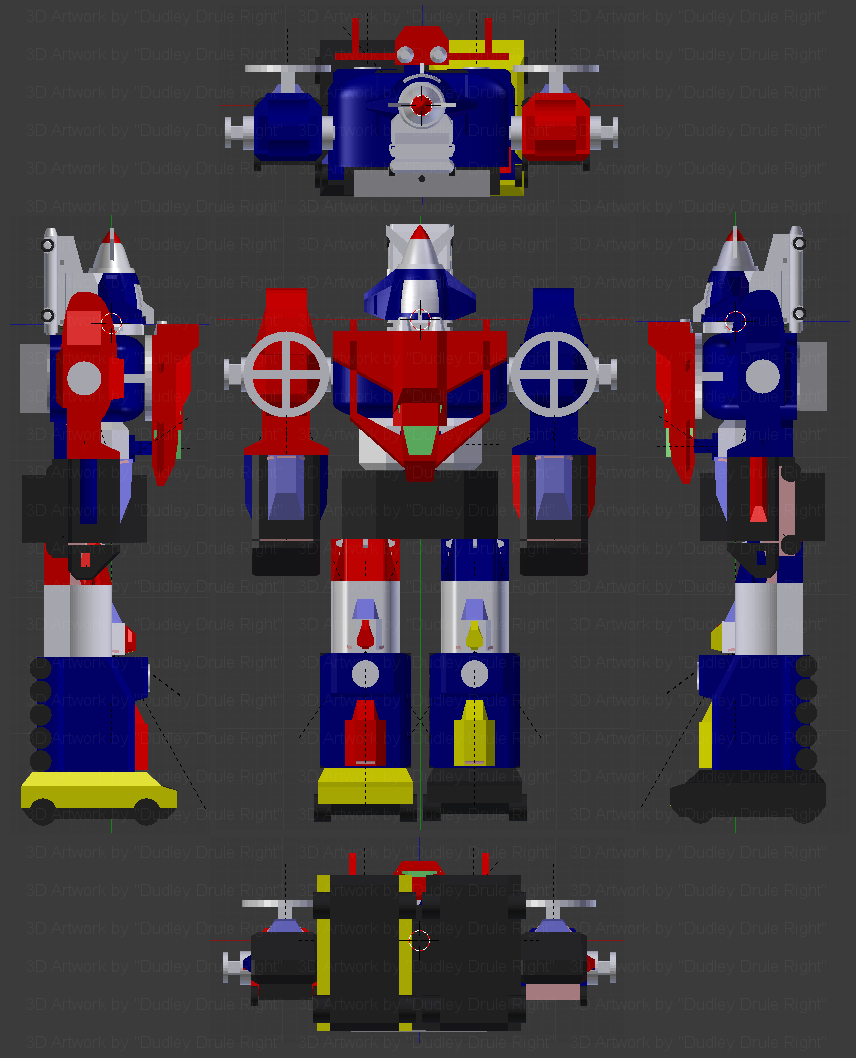 Finally here is a size comparison of Voltron standing along the actual Panosh Place (Lion Force) Voltron. 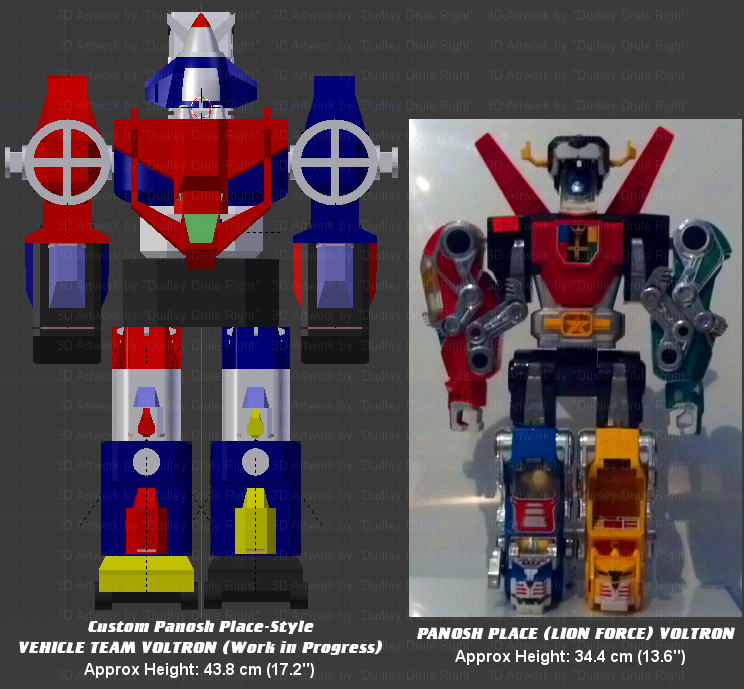 |
|
|
|
Post by repairtechjon on May 28, 2014 23:19:34 GMT -5
Seeing pics of the head piece come to reality is awesome! Really creative idea all around. Gonna be huge!
|
|
|
|
Post by dudleydrulert on Jun 3, 2014 23:32:37 GMT -5
Here is a remodeled, although neither finalized nor complete, lower torso vehicle: 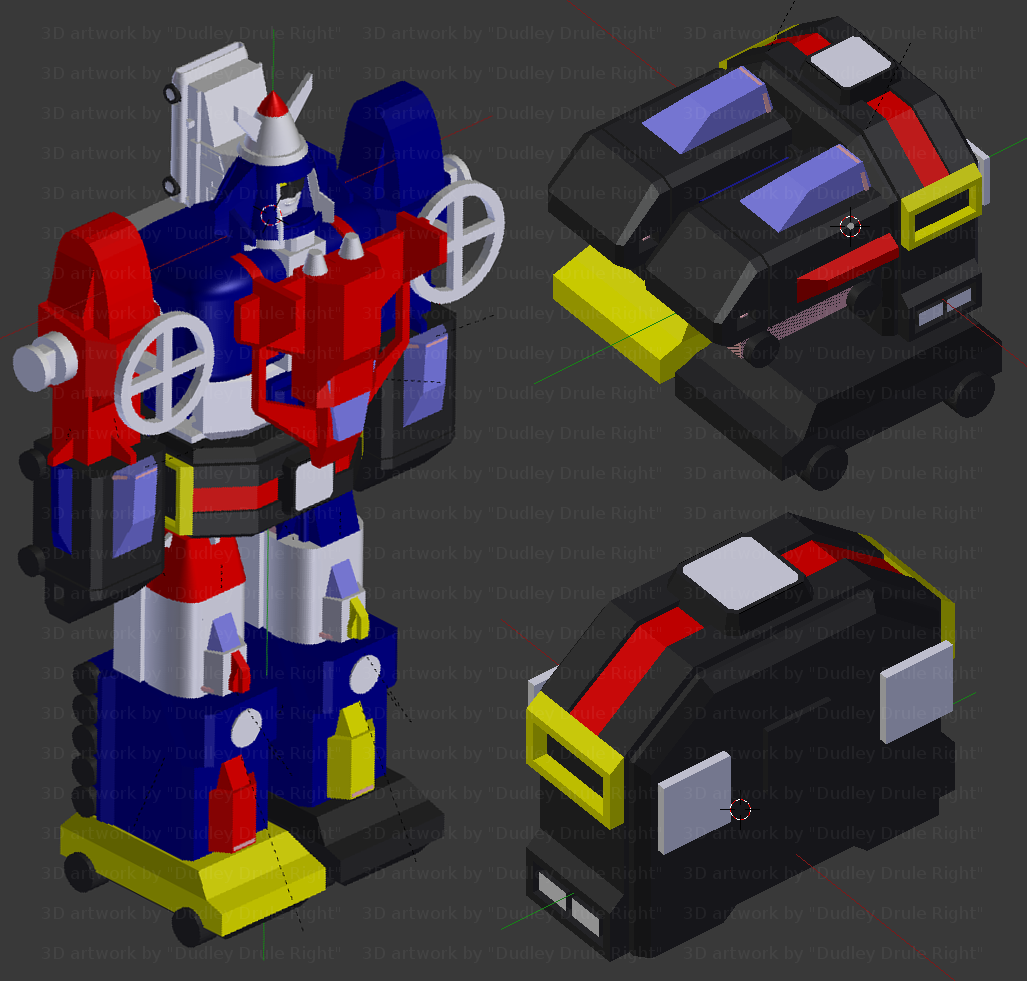 |
|
|
|
Post by boma83 on Jun 4, 2014 2:34:44 GMT -5
seems the red jet torso cockpit glass clipping on its body, or are you intend to?
|
|
|
|
Post by dudleydrulert on Jun 4, 2014 6:17:28 GMT -5
seems the red jet torso cockpit glass clipping on its body, or are you intend to? Thanks for the question! The only "finalized" vehicle design is that of the head vehicle. The other vehicles are still being modeled and refined. The chest jet, like the other non-head vehicles, is currently a bunch of shapes that only approximate the final appearance. As I design how the vehicles' action figure compartment hatches, vehicle-to-vehicle connections, and articulated parts will work, I'll also work out the vehicles' "true" shapes. During that process artifacts like the clipped window area of the chest jet will be eliminated.  |
|