|
|
Post by ninjahandz on Aug 11, 2014 12:46:17 GMT -5
|
|
|
|
Post by ninjahandz on Aug 11, 2014 12:51:06 GMT -5
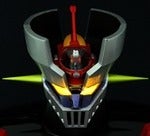
gorgeous! will the neck piece seat flush on the rear when glued? I notice some space there..or is this an adjustment your making on the program? Well, the part is so thin that it curled a bit during production so you will need to apply glue and push it down so it properly shapes to the contour of the neck. Curling of thin parts is almost inevitable when using a 3d printer but the part will regain it's original shape once you apply the glue and push down on it. |
|
|
|
Post by ninjahandz on Aug 11, 2014 13:00:45 GMT -5
Great works ! How is the surface ? Need a primer coat ? With a previous project all I did was paint straight with Tamiya paints and the surface was super smooth and shinny. I think the fuzziness just appears evident when the parts come out of the printer but once painted it looks like regular plastic. I guess a very fine piece of sandpaper would help make it as smooth as possible before painting but if the surface is a concern for you I advise printing half the kit in frosted ultra detail for those parts that need to be super smooth and detailed like the pilders and breast plates and print the other part in black plastic detail for the stuff that needs to be bendable like the tail and neck brace. I uploaded the full kit in black plastic and the kit in 2 parts (frosted and black) for those who want the best possible result. |
|
|
|
Post by TheMazingerZ on Aug 11, 2014 14:11:24 GMT -5
Thanks bro! I'm gonna wait until you have the PERFECT kit done. Once you do, can you please put the links of the BEST kit for the job? It got a little confusing with the three. Price should not be a matter of concern for something like this anyway. I'm sure we all want it to be PERFECT.  }D |
|
|
|
Post by ninjahandz on Aug 13, 2014 10:38:34 GMT -5
|
|
|
|
Post by TheMazingerZ on Aug 13, 2014 12:11:15 GMT -5
Gonna buy it right now. I'll look for my spare GX-07 later... don't know in which box it is!  }D |
|
|
|
Post by chogokinabdul on Aug 13, 2014 12:26:28 GMT -5
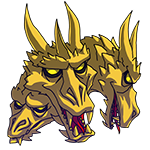
man that is awsome.. but shouldnt the shakels have sphears on them? like in the OVA ! what aout the spikes sticking out of mazinger's grill? |
|
|
|
Post by TheMazingerZ on Aug 13, 2014 12:26:51 GMT -5
Ordered! Total was $76.62 (with 9.5% tax & $4.99 shipping), but I had a $10 credit. So, $66.62 for me! }D |
|
|
|
Post by TheMazingerZ on Aug 13, 2014 12:28:56 GMT -5
chogokinabdul, those you either have to buy or make yourself. I guess adding those to the kit would make it even more expensive?
}D
|
|
|
|
Post by chogokinabdul on Aug 13, 2014 12:37:06 GMT -5
chogokinabdul, those you either have to buy or make yourself. I guess adding those to the kit would make it even more expensive? }D really ? why? why not having it molded in perfect size with the shakels? what about the spikes sticking out of the grill? |
|
|
|
Post by TheMazingerZ on Aug 13, 2014 12:48:29 GMT -5
Because it is a more complicated design to be printed. The more complexity, the higher the price. And not only that, a lot of times if the parts are too small, they can't be successfully printed by Shapeways. }D |
|
|
|
Post by ninjahandz on Aug 13, 2014 13:39:11 GMT -5
In reallity the idea from the get go was to replicate my previous custom Ashura Mazinger. I used a bunch of rhinestuds back then all over Mazinger to achieve the same look in the anime. If I where to incorporate those into the shackles, you would still need to buy rhinestuds for other areas like the crown, side of arms, chest, back, shoulder, pelvis and legs. The end result would be very shinny and perfect chromed studs on those areas and silver painted studs on the shackles. Needless to say it would look bad. The second reason is because some would like to use 6, 8 or even 12 studs per shackle. Leaving the surface blank gives you the power to use what YOU think is great. Finally, TMZ was right, making studs in plastic is way more expensive than buying a bag of 144 rhinestuds for under $2.
When making customs is better to use things that are already available rather than making them from scratch. Painting perfectly round studs on the shackles is way more annoying than just adding already available rhinestuds
As for the facial spikes, I already mentioned that those parts need to be made from scratch with putty or sculpey cause printing restrictions won't allow them to be printed.
The kit isn't intended to give you a full evil Mazinger out of the box. It provides most parts to help you make the figure with minimal effort.
Here's a list of stuff you need aside from the kit to finish the custom:
1 mm styrene or copper rod for the tail articulation
Rhinestuds in assorted sizes
Gel glue with no fumes like No-zap gel (glue HAS to be in gel format)
Sculpey, tamiya putty or similar to make the rest of the spikes on Mazinger's head
Styrene rods can also be used for that purpose
Spray paints in black, red, yellow, gold and blue-green
Black sharpie with extra fine point tip for the eye or gundam marker
Xacto hobby knife or precision knife
Very fine sandpaper
Masking tape and oil paints + fine brush for the Pilders
|
|
|
|
Post by TheMazingerZ on Aug 13, 2014 14:58:21 GMT -5
Since we are following your lead with the kit, can you post pictures of the proper assembly process for guidance?  }D |
|
|
|
Post by ninjahandz on Aug 13, 2014 15:26:50 GMT -5
I need to finish my WST Reflector figures this week and ship them out to my customers but will do a tutorial for this kit for sure next week.
|
|
|
|
Post by chogokinabdul on Aug 13, 2014 19:16:57 GMT -5
I need to finish my WST Reflector figures this week and ship them out to my customers but will do a tutorial for this kit for sure next week. thanks man for the big effort and for explainig things out how it works this project will look awsome |
|
|
|
Post by silverdonz on Aug 14, 2014 0:08:29 GMT -5
Can point me on where to get/buy the studs?
|
|
|
|
Post by magengar on Aug 14, 2014 3:53:52 GMT -5
Can point me on where to get/buy the studs? You can get the studs at your local craft store... if you're in the U.S. try Michael's or Jo-Ann Fabrics or HobbyLobby. You can also look for these stores online and order through their websites. While you're at it you can also check to see if these stores might also carry the other extra materials and tools that you may need, as listed in the Extra stuff in Ninjahandz's previous post. -------------- I gotta say this is one helluva genius project, Ninjahandz! And that you're following it up with a tutorial on how to assemble this Ash Maz kit is like waaay above and beyond anything fans here could ask for- we really appreciate this very much and soon fans here will have this kit assembled and be happy to own something that is genuinely made by your hands. Thanks Eternal!  zozo-mag |
|
|
|
Post by silverdonz on Aug 14, 2014 7:03:25 GMT -5
Can point me on where to get/buy the studs? You can get the studs at your local craft store... if you're in the U.S. try Michael's or Jo-Ann Fabrics or HobbyLobby. You can also look for these stores online and order through their websites. While you're at it you can also check to see if these stores might also carry the other extra materials and tools that you may need, as listed in the Extra stuff in Ninjahandz's previous post. -------------- I gotta say this is one helluva genius project, Ninjahandz! And that you're following it up with a tutorial on how to assemble this Ash Maz kit is like waaay above and beyond anything fans here could ask for- we really appreciate this very much and soon fans here will have this kit assembled and be happy to own something that is genuinely made by your hands. Thanks Eternal! zozo-mag Thanks tony ! |
|
|
|
Post by B- on Aug 31, 2014 21:10:07 GMT -5
Whats up with this bro?
|
|
|
|
Post by TheMazingerZ on Aug 31, 2014 21:47:33 GMT -5
Yeah... Did you fix the issue with Shapeways not wanting to print the neck-brace? I had to cancel my order because they would not print it.  }| |
|