|
|
Post by B- on Dec 30, 2013 15:35:37 GMT -5
Did it work Magengar??
|
|
|
|
Post by magengar on Dec 30, 2013 15:57:40 GMT -5
IT'S WERKIN!!! I SED, IT'S WERRRRRRKIN!!!  I tried the Hold-down combination of buttons, and made da beeeitch Tu-weRk!!!  Baron: Baron: I did excatly as you instructed, it works! THANK YOU THANK YOU THANK YOUUUU!!!  I'll snap some pics with the light effects, and button positions. This DX Maz set is really Really REALLY Epic! MrClean08: I swear by Go Nagai's mom you will NOT regret buying the DX Maz! Really, just having the Scrander set is fine but a Scrander by itself is no Scrander without a Mazinger! lol And as awesome as your photos look, you Know you gotta shoot some badass pics of the DX Maz sooner or later!
ActionAwesome:I've got my batteries installed inside mine right now. But as soon as I'm done playing with the lights and sounds, I'll remove the batteries so they won't start draining. Anytime I plan to demo the DX Maz for visiting viewers that's when I'll put the bats back in. TMZ:I'll catch up to you with the lit-up eyes, lol. The difference is I'm not gonna hack the electronics on my Maz... As soon as I restock my resin supplies and clays, I'll just make an acrylic resin copy of its face and paint the eyes from behind the acrylic on the resin copy!  zozo-mag |
|
|
|
Post by magengar on Dec 30, 2013 16:46:21 GMT -5
 Guys, in case you wonder how I got the Pilder to "float" in mid-air... ...I used a cut piece of guitar string. You can barely see the string in front of Maz's torso/waist area extending from beneath the Pilder, because I Photoshopped it out. The G, B, and High E string string (medium, or light gauge) will work. Cut a few pieces of different heights, but neither too short of too long. Mount the string IN BETWEEN the front of the rail gates as you close them. The space between the rail gates will pinch the string and hold it in place as the gates close shut. (either Top or Bottom rail gates, as shown below)  Then... gently mount the Pilder onto the string. There is a hole located underneath the Pilder, the same hole that mounts the Pilder inside the DX Mazinger's head. Just remember that the Pilder is hollow inside... Be careful not to wiggle the Pilder around, or else you'll scratch the cockpit interior. Gently position the Pilder the way you want it and the guitar string will simulate the "flight" effect. Do not let the Pilder "bobble" up and down unless you plan to use that movement as a video effect running in slow-motion to simulate the Pilder "hovering". Otherwise, try to keep the Pilder perfectly motionless so that it will not appear blurred when you photograph it. Remember: you wanna use the THINNEST guitar string possible, without the string being too weak to hold the Pilder straight up. Because later on you will need to Photoshop the string out of the pic by Picking colors of the other areas nearby and pasting the new colors over the string and blurring it away. That's how I did my "hovering" Pilder pic. If you don't have any guitar strings, you can ask a musician friend for an old used string. An alternative to the guitar string, is to use a piece of wire from a skinny Twisty-tie. If you bought a brand new appliance or electronic gadget, you'll see some chords come tied with Twisty-ties, just like the twisty-tie used for sealing the plastic on loaves of bread. Grab a twisty-tie and straighten it out with your fingers, then use a razor blade to cut the outer skin from the metal wire. The metal wire will keep your Pilder "hovering" in mid-air! I will explain a tutorial later on How to build a "Hovering" effect attachment using those guitar strings and wire, basically dipping the tip of the string or wire into a small bead of resin or solder and let the resin cure so it becomes a mounting peg for the Pilder. zozo-mag |
|
|
|
Post by B- on Dec 30, 2013 17:23:14 GMT -5
floss or fishing line works too! SO GLAD you got it to work i knew you would,It was so weird my story was: a couple weeks after I got my second DX I went to play with them and NEITHER DX effects would work I thought by using 2 remotes I screwed up the 2 Mazingers and burnt out the boxes! Took me forever to figure it out,after watching a video i remembered! I sweated that out just like you,Im guessing when you first got it to work you got a rush like no drug could give! YAY! Merry Christmas again!
|
|
|
|
Post by TheMazingerZ on Dec 30, 2013 18:23:25 GMT -5
TMZ:I'll catch up to you with the lit-up eyes, lol. The difference is I'm not gonna hack the electronics on my Maz... As soon as I restock my resin supplies and clays, I'll just make an acrylic resin copy of its face and paint the eyes from behind the acrylic on the resin copy! zozo-mag LOL! But paint won't give you this...   }D |
|
|
|
Post by actionawesome on Dec 30, 2013 19:25:11 GMT -5
Wow. Put the scrander on the back of this bad boy today. It literally tripled his shelf presence! Wow. Makes me rethink my whole display!
|
|
|
|
Post by magengar on Dec 30, 2013 19:56:57 GMT -5
LOL.... true That, TMZ, paint won't make the eyes That bright. lol Yay, Baron, I wrestled with it almost all night and thinking I musta done something wrong or wasn't doing something right. I just wish the volume on the sounds were so much LOUDER. So... here are the button functions: The top row are the A B C circuits, and the bottom row are the 1 2 3 circuits.   First: press the red button inside the chest to turn Maz ON. Then be ready to play the sounds... ...Because after about a minute of Inactivity, Maz seems to shut off the main power in order to conserve battery power. I dunno why, but it shuts off on me if I don't play any sounds for a minute or two after turning him On. The top row buttons by themselves won't do anything. By themselves: the bottom row buttons will only playback the music, as follows: 1 = Mazinger-Z Intro theme... 2 = Mazinger-Z Battle theme... 3 = Mazinger-Z Ending theme... The Combination of Top and Bottom buttons (LetterNumber):A1 = Koji shouting "Majin GO!"... "Pilder ON!" A2 = Koji shouting some weird stuff. A3 = Koji shouting another weird stuff. A2 and A3 are either battle threats and panics, or Scrander related commands, I dunno. B1 = Koji shouting "Rocketto Panch!" (Rocket Punch) B2 = Koji shouting "Koushiryouku Beam!" (Photon Beam) B3 = Koji shouting "Buresto Faia!" (Breast Fire blaster) C1 = Koji shouting "Rusta Hariken!" (Rust Hurricane) C2 = Koji shouting "Doriru Misairu!" (Drill Missile) C3 = Mazinger-Z's metallic robot march sound I haven't tried the Scrander sounds yet, I will get to it later. The DX sets have so much potential for for them, I predict we won't see the end of this particular line if Bandai could extend it or branch it out, especially with the hangar and the Scrander's flat base. On the hack side of this product, Baron Weirwulf started the first hack by adding additional magnets inside the hangar to hold the extra parts the DX Maz came with. TMZ is the first to electronically modify his DX Maz without any problems. He knows what he's doing, that's why his modification is so flawless. If I were knowledgeable in Electronics, I would do all sorts of modifications to make use of all the empty space underneath the hangar base and the Scrander base for new electronic components which could be powered by USB connection to a computer. Plastic-wise, I have ideas for additional scaffolds and platforms inside the hangar for the lab staff and maintenance crew personnel. I also wanna make the famous Mazinger-Z yellow rivet background that appears at the end of the show right before Maz is shown half-exposed during the closing credits of the episodes... ...That would be Badass! zozo-mag |
|
|
|
Post by magengar on Dec 30, 2013 20:01:42 GMT -5
Wow. Put the scrander on the back of this bad boy today. It literally tripled his shelf presence! Wow. Makes me rethink my whole display! That's my next big thing: to put the Scrander on my Maz! If this DX Maz will inspire anything, I wanna see someone make a Styrofoam version of the DX Maz WITH SCRANDER WINGS ON, as an RC airplane... the fans would go NUTS! zozo-mag |
|
|
|
Post by B- on Dec 30, 2013 20:12:05 GMT -5
Magengar,I dont see fingerprints!...YAY!! Keep it that way by getting yourself a box of rubber gloves and a microfiber towel to keep the DX clean! Unless you have those things already,just a BIG suggestion!
The only thing more ugly than dust on Chogokins is fingerprints,I hate when someone takes photos and there collection looks like it was used to clean out the inside of a KFC bucket!.
|
|
|
|
Post by magengar on Dec 30, 2013 20:40:15 GMT -5
Magengar,I dont see fingerprints!...YAY!! Keep it that way by getting yourself a box of rubber gloves and a microfiber towel to keep the DX clean! Unless you have those things already,just a BIG suggestion! The only thing more ugly than dust on Chogokins is fingerprints,I hate when someone takes photos and there collection looks like it was used to clean out the inside of a KFC bucket!. I wear my black knit winter gloves to handle him. Of course, I still have to use my bare fingers to open his panels and such, and then I wipe him with a cloth. The skin on my fingertips are VERY oily. I have plenty of Latex gloves at work, I'll bring some home tomorrow evening. Surfaces and blemishes:As for the surfaces on the DX parts, there are some minor blemishes in the paint apps. But they're barely noticeable until you look very closely at them. There's a faint blemish on the surface of the right-side translucent red Beast Fire plate, it looks a bit more deeper than a mere surface smudge. I rubbed it and it's still there. I'll leave it alone, to avoid scratching the clear red acrylic. Hangar Dust:I'm starting to wipe dust from inside the hangar. A can of compressed air will help clear dust from tight corners. Just be careful not to concentrate the compressed air too long or it will damage the plastic of the hangar. A safer thing to do is to blow through a thin clear nylon tube or hose (fish tank hose) with the end aimed at a tight corner to blow dust outta there. First, remove all the Maz parts from the hangar... it aggravates me when the parts fall off the walls from just bumping into the hangar to get something inside and to move Maz around in there. Handling Maz: I place a finger underneath his gooch (beneath the groin) while holding him by his arm pit areas. That's how I pick him up. Rotating the forearms: NEVER rotate the actual forearms! Doing so will wear away the notches that line up the forearms for reattachment. You can still get all his forearm poses by rotating the bicep. zozo-mag |
|
|
|
Post by magengar on Dec 31, 2013 7:08:55 GMT -5
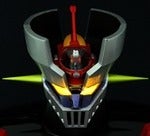
I've been up all night messing around with a custom diorama that I started making with a large cardboard box... I cut it open and painted the brown side with a coat of metallic silver paint. It's not finished yet, as I need to add some mechanical texture to it so that it will look like a "hangar". lol I'll also make a second version and paint it grey. I love the DX hangar. But Maz looks a little cramped inside that hangar, so I took him out for some elbow room... I played around with the "hovering" Hover Pilder trick again...     zozo-mag |
|
|
|
Post by B- on Dec 31, 2013 8:10:49 GMT -5
Very cool!! Lovin all this,your bringing new life to this thread and this figure!!
|
|
|
|
Post by magengar on Dec 31, 2013 8:27:39 GMT -5
Thanks, Baron! I like to explore and branch out with this in any way possible; and I hope it doesn't wear off on me anytime soon. There's just so much potential with the DX sets- untapped potential- it surprises me that something like this item could be left dormant. zozo-mag |
|
|
|
Post by ninjahandz on Dec 31, 2013 8:35:36 GMT -5
Hey Magengar, I don't think you can recast the head and paint behind the eyes. That was the first thing I atempted as soon as I pulled Maz out of the box but the eyes seem to extrude all the way to the center of the head. If you were to paint them from behind, the paint wouldn't show up at all on the front side. The only option so far is to paint the front of the eyes but I see why you are trying to avoid that
Maybe casting in yellow resin would solve the issue but the yellow wouldn't be as bright as you want it
Cutting the part behind the eyes is not an option as that part doubles as the crown floor where the pilder docks
If you pull it off, let me know cause I really want to try this too
|
|
|
|
Post by actionawesome on Dec 31, 2013 15:45:14 GMT -5
BTW magengar. I don't think it was heresy to put the Voltron in the hangar. Ever since I got the scrander set I have considered doing that but with Big O instead!
|
|
|
|
Post by magengar on Dec 31, 2013 17:07:22 GMT -5
Hey Magengar, I don't think you can recast the head and paint behind the eyes. That was the first thing I atempted as soon as I pulled Maz out of the box but the eyes seem to extrude all the way to the center of the head. If you were to paint them from behind, the paint wouldn't show up at all on the front side. The only option so far is to paint the front of the eyes but I see why you are trying to avoid that Maybe casting in yellow resin would solve the issue but the yellow wouldn't be as bright as you want it Cutting the part behind the eyes is not an option as that part doubles as the crown floor where the pilder docks If you pull it off, let me know cause I really want to try this too I realized the inside of the eyes are molded as part of the Pilder floor, as soon as I looked at the face molds. I can try some other work-around idea. Or I can go with my original plane and paint a resin copy of the face, using a mixture of neon yellow mixed into the resin as a colorant... then I can just paint the head with the other colors and leave the eyes as the neon yellow. In any case I've got some spare LED bulbs and watch batteries; I will get my eyes lit. Bwaaaaahahahahahahaha. zozo-mag |
|
|
|
Post by magengar on Dec 31, 2013 17:13:32 GMT -5
BTW magengar. I don't think it was heresy to put the Voltron in the hangar. Ever since I got the scrander set I have considered doing that but with Big O instead! I know, I was just Jyerkin Chyains pokin fun at all the purists out there who might catch a teetie-attack at the sight of another robot standing inside Mazinger's hangar. In their galaxy such an act of 'sacrilege' is punishable by a death-stoning in a hail of D-cell batteries, broken dai-gokins, and Trendmaster Voltron parts. zozo-mag |
|
|
|
Post by B- on Jan 2, 2014 19:39:30 GMT -5
BTW magengar. I don't think it was heresy to put the Voltron in the hangar. Ever since I got the scrander set I have considered doing that but with Big O instead! BIG O would look awesome in the hangar! |
|
|
|
Post by magengar on Jan 3, 2014 4:08:21 GMT -5
BTW magengar. I don't think it was heresy to put the Voltron in the hangar. Ever since I got the scrander set I have considered doing that but with Big O instead! BIG O would look awesome in the hangar! true Dat, true Dat! Big O, Gundam, Zeorymer, Getter, Optimus Prime, Combattler, even Super-Cock! ...the list goes on and on. Model aircarft, model military vehicles... even Crash Test Dummies, too! It's amazing how the DX hangar can lend itself to so many applications beyond just the DX Maz! Oh, btw, I played with the sounds again... press and hold buttons A and C together in combination with any one of the lower buttons (1, 2, or 3) and you'll hear all the Jet Scrander shout-outs. YYYYYYYYYESSSSSSSSSSSS!   zozo-mag |
|
|
|
Post by B- on Jan 3, 2014 5:10:51 GMT -5
Is this what you mean Tony LOL?  |
|